Preparing Custom maps for Garmin GPS
Sun 25 Sep, 2011 3:19 pm
I have been asked if I would do a post on how to make and prepare Custom Maps for use in a Garmin mapping GPS, while the process is not that hard it is fairly involved and requires some computer skills, a good photo manipulation program, a great little file tiling program called G-Raster and some Google Earth knowledge and skills.
I am not much of a Techno person, consider this write-up as a Beta version, if you more technical savvy people know that of better ways of doing custom maps or improvements to what I have written please let me know and I will update post, when properly sorted I will post this information in the BA wiki.
Step 1: Scan map on suitable scanner, I scan in tiff 300 pixels per inch (PXI), I keep these Tiff files as masters, then in a photo processing program (I use Photoshop), convert to JPEG 300 PXI, my experimenting has shown that scanning in JPEG 300 PXI is the best quality for reading the maps on the GPS screen without using too much of the 100 x 1 meg GPS custom map memory, I have tried lesser than 300 PXI, but the quality seen on the GPS suffers below this level. If you do not have access to a large scanner, it is possible to scan in A4 or A3 and stitch together, I use Photomerge in Photoshop.
Step 2: Note: Step 2 instructions are specifically for Photoshop
Once the map is scanned and or stitched, level and crop the map to desired size,( I have been keeping the whole map as will be explained in a later sections of the map can be loaded), I then save map as JPEG 300 PXI and with compression of 10, do not forget to name map with desired name, then under drop down window image, choose resize, image size, if doing full map resize image to image width of 6000 pixels, the height will be about 3700 pixels, keep at 300 PXI, save, or if doing part of map, eg half of the map, save width 3000 pixels, (note in Photoshop when adjusting the width the height is automatically adjusted accordingly).
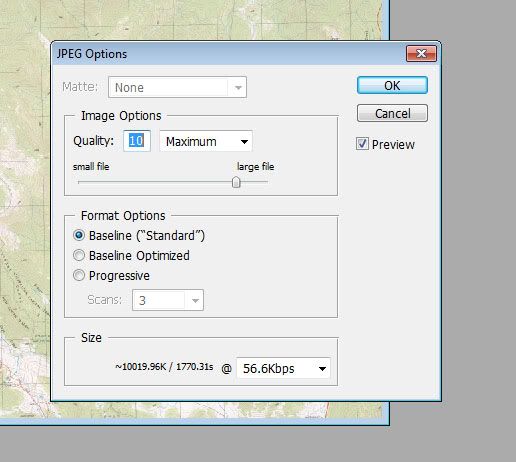
Saving options window

Image size options window
Step 3:Geo-reference map image in Google Earth.
Open Google Earth, under the ‘Add drop down window’, open Image overlay window, in the window, open browse and then open desired map jpeg file, drag image overly window away from map, do not close overlay window yet or save image yet.
The map image will appear in Google Earth, a hint is to try and get the Google Earth window about the correct size, if you do not already have the World Wide UTM’s, down load the World Wide UTM Grid Lines http://www.gelib.com/worldwide-utm-grid.htm as this will help in geo-referencing your maps, it is possible to geo-reference your map from the features like roads and streams but the UTM are the easiest.
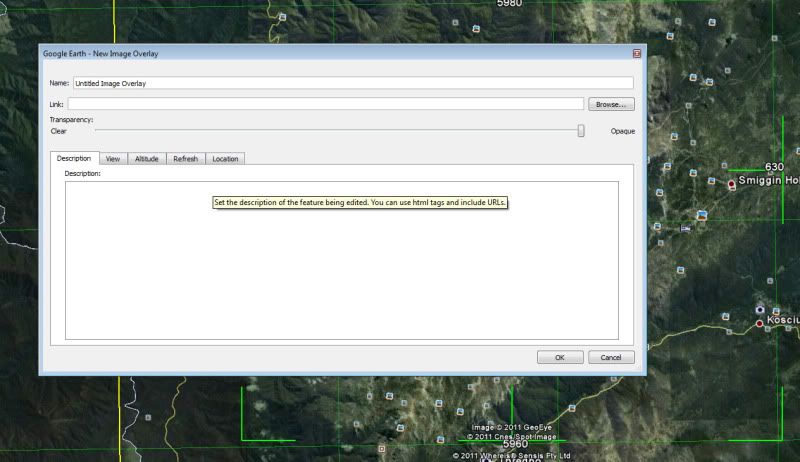
Add image overlay window, if not using UTM's it is possible to opaque the image to align roads and rivers etc.
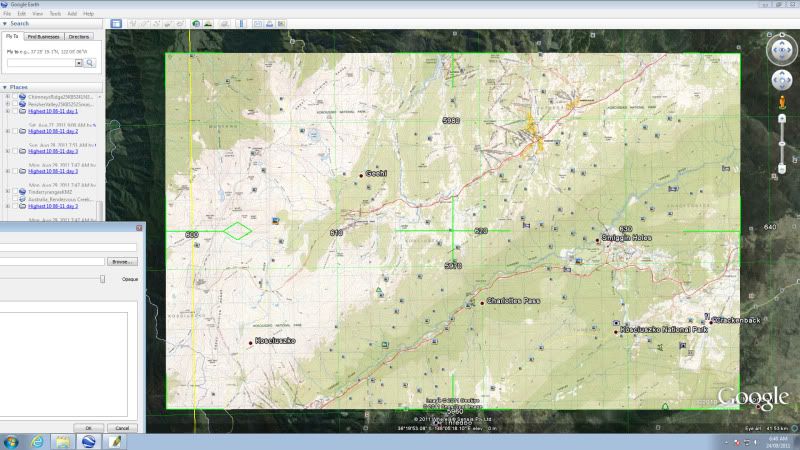
Step 4:Align UTM’s on map with UTM’s on Google Earth,
When the image overly comes up on Google Earth, the image has some green lines on it, if you put your curser on any of these green lines and left click, you can manipulate the image, this is easy to do and with some practice does not take too long to do, there is more information on how to do this on Google Earth help, but warning, if you click on the corners you can distort the map, I have found that while sometimes this feature can be useful, I normally do not need to touch it. When happy with position of image, name image file and save, the map image is then geo referenced. The file will be saved in the left side bar.
Step 5:Save as KMZ file.
Right click on saved file, a saved file a window appears, then do Save Place as, choose desired file name, desired location and format of KMZ (this last step is important).
Step 6:Break KMZ file into GPS readable files.
The Garmin GPS 62s can only read custom maps files of a maximum of 1024 x 1024 pixels or 1 meg files, and only 100 of these files can be read by the 62s at one time, and it is where it will cost some money.
Down load a program called G-Raster, cost $5, this nice little program breaks up the larger KMZ file (and other formats) into the 1024 x 1024 pixel files that is required and is money well spent, you can use the free trial version but this is very limited and will only do small files, the full version will handle the full 6000 x 3700 pixel file and more. G-Raster breaks the 6000 x 3700 pixel files up into 24 individual files, eg approx 24 1 Mega pixel files, but when loaded into the GPS it sees the map as one file. BUT there is one advantage that these files can be turned off and on in Google Earth, as mentioned previously my 62s can only store 100 one meg pixel map files, this means that I can only store 4 full maps in the custom map folder, but if the G-Rastered KMZ file is then opened in Google Earth and you then expand the file in the side bar, you can see that the named folder has 24 files inside it and you can turn off any of these files that you think you do not needed, and if you re-save the file with the un needed files turned off, the map file requires much smaller storage so more maps can be loaded. With most of my walking, having four complete maps in the Custom Maps folder is OK but if you where crossing a corner of a map of doing a longer walk which requires more maps you can load much smaller sections.
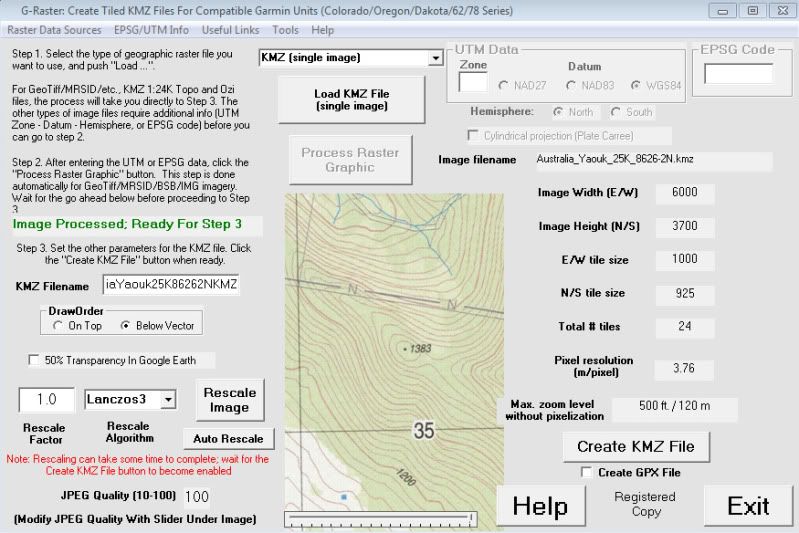
G-raster interface page.
Open G-Raster, in top middle window choose file type, in this case choose KMZ (single image), then click on Load KMZ File (single image), once loaded then click on Create KMZ file in the lower left corner, after a few seconds a Done window appears and it tells you that it has save the file in the same directory as the original image with KMZ.kmz on the end., the message also recommends that you reload the file into Google Earth to check accuracy.
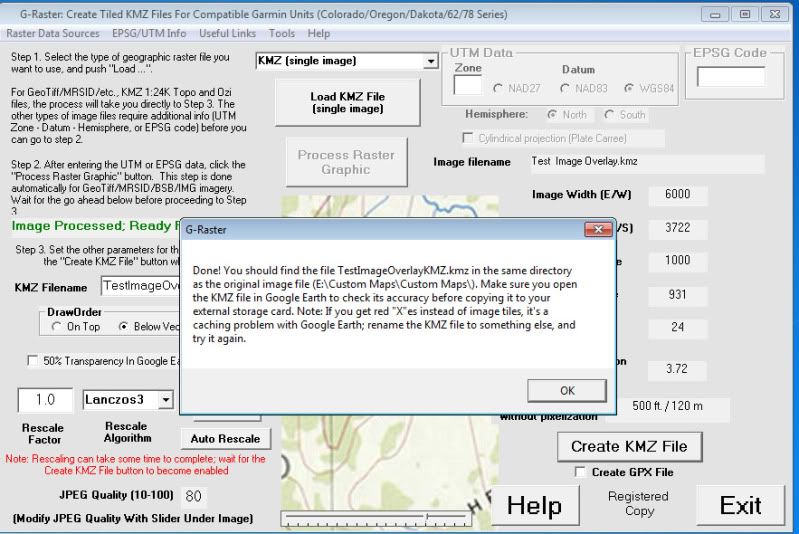
G-Raster save window
Step 7: Check New KMZ.kmz file.
Open Google Earth, check new file for geo referencing accuracy and as mentioned in step 6 if needed the map image can now have some of the 24 1 meg files turned off, please note, if this is done to do a save as and change file name as you may loose the original file.
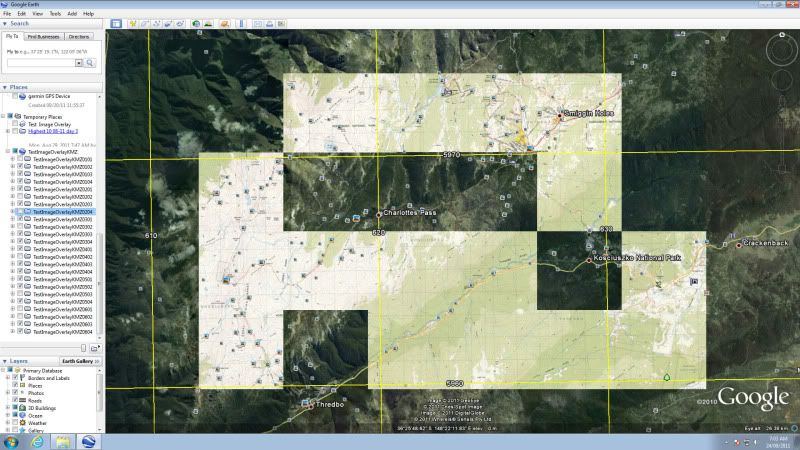
Some tiles turned off.
Step 8: Check map in GPS.
Plug GPS via USB cable into computer, load map file into custom maps, turn GPS on and check, make sure that the GPS setting are set to load maps.
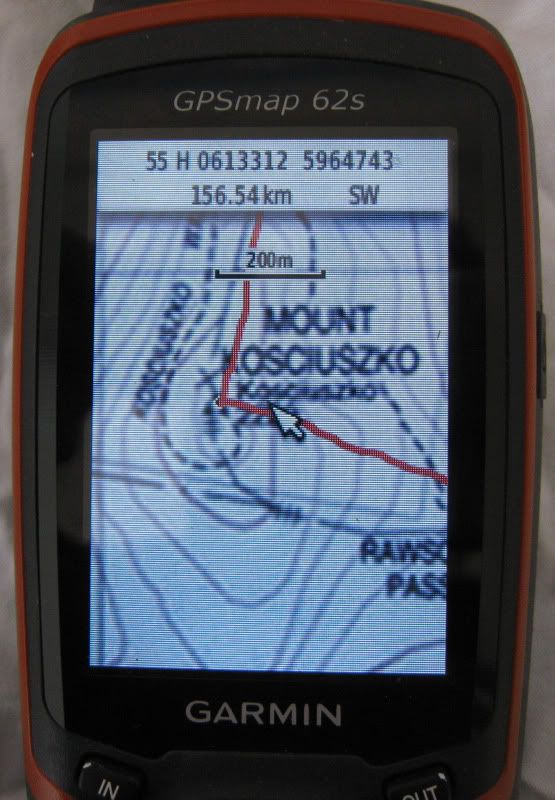
This is a track recording of a recent trip up Mt Kosciuszko note the accuracy of my route in relation to the trig point.
Step 9: go walking.
An important Note on inaccuracy:
As with everything there are some inherent measurement errors, that is the nature of measurement, with using custom maps, there are some errors in scanning maps, paper can change dimensions with moisture, scanning and stitching can introduce some error, Google Earth has some error, the GPS has some error, this is the nature of all of these system, so if you see some errors like the top of a hill is not exactly in the right place or a track is slightly off then do not be alarmed, in the few walks that I have used my scanned maps I have found that the accuracy of my GPS custom maps is quite reasonable.
I am not much of a Techno person, consider this write-up as a Beta version, if you more technical savvy people know that of better ways of doing custom maps or improvements to what I have written please let me know and I will update post, when properly sorted I will post this information in the BA wiki.
Step 1: Scan map on suitable scanner, I scan in tiff 300 pixels per inch (PXI), I keep these Tiff files as masters, then in a photo processing program (I use Photoshop), convert to JPEG 300 PXI, my experimenting has shown that scanning in JPEG 300 PXI is the best quality for reading the maps on the GPS screen without using too much of the 100 x 1 meg GPS custom map memory, I have tried lesser than 300 PXI, but the quality seen on the GPS suffers below this level. If you do not have access to a large scanner, it is possible to scan in A4 or A3 and stitch together, I use Photomerge in Photoshop.
Step 2: Note: Step 2 instructions are specifically for Photoshop
Once the map is scanned and or stitched, level and crop the map to desired size,( I have been keeping the whole map as will be explained in a later sections of the map can be loaded), I then save map as JPEG 300 PXI and with compression of 10, do not forget to name map with desired name, then under drop down window image, choose resize, image size, if doing full map resize image to image width of 6000 pixels, the height will be about 3700 pixels, keep at 300 PXI, save, or if doing part of map, eg half of the map, save width 3000 pixels, (note in Photoshop when adjusting the width the height is automatically adjusted accordingly).
Saving options window
Image size options window
Step 3:Geo-reference map image in Google Earth.
Open Google Earth, under the ‘Add drop down window’, open Image overlay window, in the window, open browse and then open desired map jpeg file, drag image overly window away from map, do not close overlay window yet or save image yet.
The map image will appear in Google Earth, a hint is to try and get the Google Earth window about the correct size, if you do not already have the World Wide UTM’s, down load the World Wide UTM Grid Lines http://www.gelib.com/worldwide-utm-grid.htm as this will help in geo-referencing your maps, it is possible to geo-reference your map from the features like roads and streams but the UTM are the easiest.
Add image overlay window, if not using UTM's it is possible to opaque the image to align roads and rivers etc.
Step 4:Align UTM’s on map with UTM’s on Google Earth,
When the image overly comes up on Google Earth, the image has some green lines on it, if you put your curser on any of these green lines and left click, you can manipulate the image, this is easy to do and with some practice does not take too long to do, there is more information on how to do this on Google Earth help, but warning, if you click on the corners you can distort the map, I have found that while sometimes this feature can be useful, I normally do not need to touch it. When happy with position of image, name image file and save, the map image is then geo referenced. The file will be saved in the left side bar.
Step 5:Save as KMZ file.
Right click on saved file, a saved file a window appears, then do Save Place as, choose desired file name, desired location and format of KMZ (this last step is important).
Step 6:Break KMZ file into GPS readable files.
The Garmin GPS 62s can only read custom maps files of a maximum of 1024 x 1024 pixels or 1 meg files, and only 100 of these files can be read by the 62s at one time, and it is where it will cost some money.
Down load a program called G-Raster, cost $5, this nice little program breaks up the larger KMZ file (and other formats) into the 1024 x 1024 pixel files that is required and is money well spent, you can use the free trial version but this is very limited and will only do small files, the full version will handle the full 6000 x 3700 pixel file and more. G-Raster breaks the 6000 x 3700 pixel files up into 24 individual files, eg approx 24 1 Mega pixel files, but when loaded into the GPS it sees the map as one file. BUT there is one advantage that these files can be turned off and on in Google Earth, as mentioned previously my 62s can only store 100 one meg pixel map files, this means that I can only store 4 full maps in the custom map folder, but if the G-Rastered KMZ file is then opened in Google Earth and you then expand the file in the side bar, you can see that the named folder has 24 files inside it and you can turn off any of these files that you think you do not needed, and if you re-save the file with the un needed files turned off, the map file requires much smaller storage so more maps can be loaded. With most of my walking, having four complete maps in the Custom Maps folder is OK but if you where crossing a corner of a map of doing a longer walk which requires more maps you can load much smaller sections.
G-raster interface page.
Open G-Raster, in top middle window choose file type, in this case choose KMZ (single image), then click on Load KMZ File (single image), once loaded then click on Create KMZ file in the lower left corner, after a few seconds a Done window appears and it tells you that it has save the file in the same directory as the original image with KMZ.kmz on the end., the message also recommends that you reload the file into Google Earth to check accuracy.
G-Raster save window
Step 7: Check New KMZ.kmz file.
Open Google Earth, check new file for geo referencing accuracy and as mentioned in step 6 if needed the map image can now have some of the 24 1 meg files turned off, please note, if this is done to do a save as and change file name as you may loose the original file.
Some tiles turned off.
Step 8: Check map in GPS.
Plug GPS via USB cable into computer, load map file into custom maps, turn GPS on and check, make sure that the GPS setting are set to load maps.
This is a track recording of a recent trip up Mt Kosciuszko note the accuracy of my route in relation to the trig point.
Step 9: go walking.
An important Note on inaccuracy:
As with everything there are some inherent measurement errors, that is the nature of measurement, with using custom maps, there are some errors in scanning maps, paper can change dimensions with moisture, scanning and stitching can introduce some error, Google Earth has some error, the GPS has some error, this is the nature of all of these system, so if you see some errors like the top of a hill is not exactly in the right place or a track is slightly off then do not be alarmed, in the few walks that I have used my scanned maps I have found that the accuracy of my GPS custom maps is quite reasonable.
Last edited by Tony on Mon 26 Sep, 2011 2:45 pm, edited 1 time in total.
Re: Preparing Custom maps for Garmin GPS
Sun 25 Sep, 2011 4:57 pm
Interesting use of Google Earth, haven't seen that before.
Not familiar with the 62s, what format are the maps it reads from this procedure, .kmz?
Nice write-up!
Not familiar with the 62s, what format are the maps it reads from this procedure, .kmz?
Nice write-up!
Re: Preparing Custom maps for Garmin GPS
Sun 25 Sep, 2011 7:00 pm
photohiker wrote:Interesting use of Google Earth, haven't seen that before.
Not familiar with the 62s, what format are the maps it reads from this procedure, .kmz?
Nice write-up!
Hi Photohiker,
Thanks, Google Earth is a very powerfull program, the more I learn about it the more I am impressed.
The Garmin 62s customs reads .kmz format.
Tony
Re: Preparing Custom maps for Garmin GPS
Sun 25 Sep, 2011 7:50 pm
Thats an interesting post - thanks Tony.
Google Earth has some features and I'm still finding them thanks to this.
The 62S looks interesting.
How do you find battery life and I see they say its sunlight-readable 65K colour screen.
How do you find this in our good old Aussie sun?
Also see a camera model - wonder what the reults are like?
Google Earth has some features and I'm still finding them thanks to this.
The 62S looks interesting.
How do you find battery life and I see they say its sunlight-readable 65K colour screen.
How do you find this in our good old Aussie sun?
Also see a camera model - wonder what the reults are like?
Re: Preparing Custom maps for Garmin GPS
Sun 25 Sep, 2011 8:16 pm
taswegian wrote:Thats an interesting post - thanks Tony.
Google Earth has some features and I'm still finding them thanks to this.
The 62S looks interesting.
How do you find battery life and I see they say its sunlight-readable 65K colour screen.
How do you find this in our good old Aussie sun?
Also see a camera model - wonder what the reults are like?
Hi Taswegian,
I am still learning with the batteries, the first time I used the 62s, was a three day trip in the snow, I used Alkaline batteries and as it was cold the Alkaline batteries really struggled, with keeping the GPS inside my shirt pocket and changing batteries a few times I managed.
I have since purchased some Sanyo, eneloop NiMh 2000mw batteries, I have only used thes new batteries for a 5 hour day walk and I ahve played around with the GPS for a few hours since and they still have a lot of charge left, but I need more usage time to know more.
I think the camera models are getting better, there is also a odel with a two way radio in it.
Tony
Re: Preparing Custom maps for Garmin GPS
Wed 19 Oct, 2011 2:56 pm
G,day havn trouble loading Aus/NZ topo map from disk to 62s garmin gps say,s its on there but its not anyone got any ideas Cheers moorey.
Re: Preparing Custom maps for Garmin GPS
Wed 19 Oct, 2011 6:39 pm
taswegian wrote:Thats an interesting post - thanks Tony.
Google Earth has some features and I'm still finding them thanks to this.
The 62S looks interesting.
How do you find battery life and I see they say its sunlight-readable 65K colour screen.
How do you find this in our good old Aussie sun?
Also see a camera model - wonder what the reults are like?
Hi Taswegian. I have owned a model 62s for around 6 months now.
Battery life is fantastic when using the expensive lithium (silver) energizer batteries. With normal batteries it is still reasonable.
I have used it to navigate around NZ both on road (campervan) and on track (hiking). I didn't think it would have the battery life needed to function as a road GPS, but it does when used with the expensive batteries.
I find the screen easy to see, even in sunlight. Although in direct glare (like anything with a screen), you might have to tilt it slightly.
Even better, at night the screen changes the colours for night use.
The altitude meter seems to be very accurate also, in contrast to some GPSs I have used in the past.
I bought the SD card maps of NZ and Australia (on one card). They are very good, labelling the smallest track, and even rocks if they are large enough to be used as a reference point.
In summary, so far it has performed well and I really like it.
Re: Preparing Custom maps for Garmin GPS
Wed 19 Oct, 2011 6:59 pm
moorey1969 wrote:G,day havn trouble loading Aus/NZ topo map from disk to 62s garmin gps say,s its on there but its not anyone got any ideas Cheers moorey.
Hi moorey1969,
The 62s can oly read maps that are no bigger than 1024 x 1024 pixels, so larger maps have to be tiled, that is where G-Raster comes in.
I have put maps from the NSW Topo DVD into my 62s but they have to be tiled first and the quality is poor.
Tony
Re: Preparing Custom maps for Garmin GPS
Sun 30 Oct, 2011 4:53 pm
Cheers Tony was a waste of cash wish I had of known would have saved a lot of stress to,Moorey
Re: Preparing Custom maps for Garmin GPS
Tue 29 Nov, 2011 1:31 pm
Hi Tony,
Thanks for the great write up, I've recently bought my first mapping gps and this has really helped me get my head around setting it up.
This is fantastic and not just for aligning the map with google earth, its nice to just have them up on Google earth, a tip worthy in it's own right!
I've got the 5m australian contours DVD on the way which I was going to overlay on shonky maps as one option but I'm also thinkng about using the google maps 'terrain' function as a layer with the 5m contours instead of shonkys as it makes for a better look as the shading is far superior
Thanks for the great write up, I've recently bought my first mapping gps and this has really helped me get my head around setting it up.
Tony wrote:...if you do not already have the World Wide UTM’s, down load the World Wide UTM Grid Lines http://www.gelib.com/worldwide-utm-grid.htm as this will help in geo-referencing your maps, it is possible to geo-reference your map from the features like roads and streams but the UTM are the easiest...
This is fantastic and not just for aligning the map with google earth, its nice to just have them up on Google earth, a tip worthy in it's own right!
I've got the 5m australian contours DVD on the way which I was going to overlay on shonky maps as one option but I'm also thinkng about using the google maps 'terrain' function as a layer with the 5m contours instead of shonkys as it makes for a better look as the shading is far superior
Re: Preparing Custom maps for Garmin GPS
Tue 29 Nov, 2011 8:39 pm
Have tried the features and it takes a bit of time; but I have fun. Will look into the UTM. Thanks.
Re: Preparing Custom maps for Garmin GPS
Sun 27 May, 2012 9:52 am
Hi Tony
Superb post! Thanks for introducing me to geo-referencing using Google Earth and the UTM overlay.
Superb post! Thanks for introducing me to geo-referencing using Google Earth and the UTM overlay.
Re: Preparing Custom maps for Garmin GPS
Mon 17 Sep, 2012 2:05 am
Nice article Tony with some very useful information.
There is a bit more info on Google here including the kml with the tasmaps grid from tastrax.
A couple of tips that may help some folk.
I find it useful to turn off Elevation before working with overlays.
And if you'll be zooming in very close, go the Navigation tab and choose "Do not automatically tilt when zooming".
If the map has the grid marked on it, then I like to crop the map to the exact grid size.
To line up the image perfectly, once I import the image into the overlay, in the properties box, I choose the location tab. On this tab I click the "Convert to LatLonQuad" button. This allows me to independently move each corner of the overlay.
Then I can zoom in and align each corner to the grid. Setting the opaque level about halfway lets me check that roads etc. line up.
I use the Tasmaps grid TasTrax supplied (white grid) not the UTM (yellow grid). As you can see the grids use different datum.
I'm hoping that when the new maps are released Tasmaps will have done all the hard work since there will be a kmz option.
There is a bit more info on Google here including the kml with the tasmaps grid from tastrax.
A couple of tips that may help some folk.
I find it useful to turn off Elevation before working with overlays.
And if you'll be zooming in very close, go the Navigation tab and choose "Do not automatically tilt when zooming".
If the map has the grid marked on it, then I like to crop the map to the exact grid size.
To line up the image perfectly, once I import the image into the overlay, in the properties box, I choose the location tab. On this tab I click the "Convert to LatLonQuad" button. This allows me to independently move each corner of the overlay.
- google-3.png (41.53 KiB) Viewed 17858 times
Then I can zoom in and align each corner to the grid. Setting the opaque level about halfway lets me check that roads etc. line up.
- google2.png (348.59 KiB) Viewed 17858 times
I use the Tasmaps grid TasTrax supplied (white grid) not the UTM (yellow grid). As you can see the grids use different datum.
I'm hoping that when the new maps are released Tasmaps will have done all the hard work since there will be a kmz option.
© Bushwalk Australia and contributors 2007-2013.