Wurrumbungle National Park
Author: Peter Fox
Edition: 1
Publisher: The Beaten Track Press
ISBN: 1876131004
Number of pages: 80
Year of Publication: 1996
Cover Price (au$): 11.00
Format: Paperback
Website: http://www.beatentrack.com.au/btgroup/btg_frame.cfm?topic=catalogue&product=catalogue
Weight (grams): 225
Regions the book covers: Warrumbungle National Park
Height (cm): 25
Subjects:
National parks and reserves - New South Wales,Warrumbungle National Park (N.S.W.), Physical geography - New South Wales - Warrumbungle Range
Interpretive Information: Detailed
Grade system explained: No
Date walks last reviewed provided: No
A summary of walks provided: Yes
Regional Map of walks provided: Yes
Maps designed for walking: Yes - limited detail
Type of maps used (for walking): Simple Topographic
Colour used in walking maps: Multicolour
Size of walking maps: Full page
Walking map Comment: Lift out walking information including maps an extra 28 page booklet. Maps are aerial photographs with tracks and other features marked.
Colour depth of photos: Colour
Level of detail in tracknotes: Detailed route information
Take A Walk in Kosciuszko National Park
Author: John Daly,Lyn Daly
Edition: 1
Publisher: Take a Walk Publications
ISBN: 9780957793187
Number of pages: 255
Year of Publication: 2010
Cover Price (au$): 34.95
Format: Paperback
Website: http://www.takeawalk.com.au/
Weight (grams): 340
Regions the book covers: kosciuszko national park
Height (cm): 21
Subjects:
Hiking - New South Wales - Kosciuszko National Park - Guidebooks. | National parks and reserves - New South Wales - Kosciuszko National Park - Guidebooks. | Kosciuszko National Park (N.S.W.) - Guidebooks.
Niche: kosciuszko
Grade system explained: Yes
Ascent and/or Decent provided: No
Driving directions provided: Yes
Date walks last reviewed provided: No
A summary of walks provided: Yes
Regional Map of walks provided: Yes
Maps designed for walking: Yes - reasonable detail
Type of maps used (for walking): Sketch
Colour used in walking maps: Multicolour
Size of walking maps: 1/4 page
Walking map Comment: varey in sizes
Colour depth of photos: Colour
Comment on Photographs: small to medium colour photo's every second page
Level of detail in tracknotes: General route description
Alternate route and side trip suggestions: Some walks
Take a walk in a national park – Sydney to Port Macquarie
Author: John Daly, Lyn Daly
Edition: 1
Publisher: Take A Walk Publications
ISBN: 0957793111
Number of pages: 224
Year of Publication: 2000
Cover Price (au$): 21.95
Format: Paperback
Website: http://www.takeawalk.com.au/
Weight (grams): 390
Regions the book covers: Between Sydney City and Port Macquarie NSW (mostly near the coast)
Height (cm): 21
Subjects:
Hiking - New South Wales - Guidebooks,National parks and reserves - New South Wales - Guidebooks
Interpretive Information: Plenty
Grade system explained: No
Ascent and/or Decent provided: No
Driving directions provided: Yes
Date walks last reviewed provided: No
A summary of walks provided: Yes
Regional Map of walks provided: Yes
Maps designed for walking: No - no maps intended for use when walking
Colour depth of photos: Colour
Comment on Photographs: Colour plat of 16 photo's provided at the centre of the book. No other photos provided
Level of detail in tracknotes: Detailed route information
Alternate route and side trip suggestions: Some walks
Discovering New South Wales Rainforests : A Touring Walking And Cycling Guide
Author: Ed: Jeff Angel, Ed: Angela Raymond, Ed: Rod Ritchie
Edition: 1
Publisher: Total Environment Centre and Rainforest Publishing
ISBN: 0959050701
Number of pages: 158
Year of Publication: 1985
Format: Paperback
Weight (grams): 250
Regions the book covers: New South Wales
Height (cm): 21
Subjects:
Rain forests - New South Wales - Guidebooks,National parks and reserves - New South Wales - Guidebooks,New South Wales - Guidebooks
Interpretive Information: Detailed
Grade system explained: No
Ascent and/or Decent provided: No
Driving directions provided: Yes
Date walks last reviewed provided: No
A summary of walks provided: No
Regional Map of walks provided: No
Maps designed for walking: No - no maps intended for use when walking
Walking map Comment: Maps of each region provided, but additional maps required for walking.
Colour depth of photos: Black and White
Comment on Photographs: There are a few regional photographs throughout the book, and quite a few pistographs of animals and plants.
Level of detail in tracknotes: Overview only
Bushwalks in the Sydney Region : Volume 2
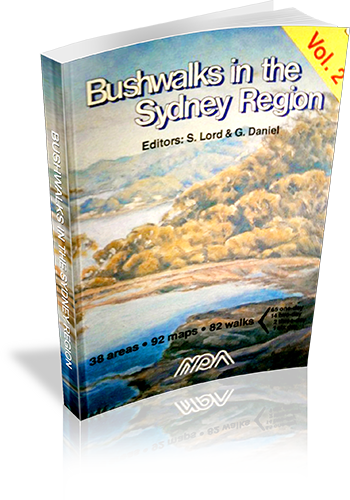
Author: Ed: Stephen Lord,Ed: George Daniel
Edition: 4
Publisher: National Parks Association of New South Wales Inc
ISBN: 0975741608
Number of pages: 164
Year of Publication: 2006
Cover Price (au$): 26.95
Format: Paperback
Website: http://www.npansw.org.au/website/index.php?option=com_wrapper&Itemid=418
Weight (grams): 305
Regions the book covers: Sydney and surrounds
Height (cm): 25
Subjects:
Hiking -- New South Wales -- Sydney Region -- Guidebooks,Sydney Region (N.S.W.) -- Guidebooks
Authors Comments:
THESE BOOKS (vols 1&2) are the results of the efforts of volunteers to produce two new walks books which would describe interesting walks in the Sydney region and raise funds for NPA.
THE SYDNEY REGION: Nominated as an area within 110km radius from Sydney. It includes:- Frazer Park to the N – Glen Davis to the NW – Jenolan Caves & Kanangra Walls to the W – Yerranderie to the SW – and the Northern Part of Morton NP & [nr] Nowra in the SSW.
THE WALKS are generally those not covered by other walks books however some classic walks are included such as Valley of the Waters and Blue Gum Forest. There are some walks that have not previously been described. Volume 1 has 93 walks and Volume 2 has 80 walks.
THE MAPS are of 1:25000 scale which we considered the minimum for the detail required. Most one day walks fit on a single page map. [The small pocket sized book philosophy was just not good enough]. All maps have True North up and include a compass variation/bearing aid diagram. All maps have a key included. All maps show km guide marks along the route. Spot heights are shown (in metres above sea level) at significant places. Most maps are within 1 page of their respective walk descriptions. Rivers and creeks have direction of flow shown. All maps are in two colours. In many cases the maps and track notes will save having to obtain NP&WS pamphlets, or other maps.
THE TRACK NOTES (DESCRIPTIONS). By using several techniques, we fit more text per page than other similar sized books. The notes give directions for getting to starting point of each walk; they also mention where to obtain water, where navigation care is required, (with detailed help), point out where hazards are, and even mention good places to stop for lunch etc.
PAPER: The books are printed on paper from sustainable forests. Book size is approx 250x175x10mm thick.
PROCEEDS, all go to support NPA projects and activities.
Niche: Many walks in Sydney and surrounding regions.
Interpretive Information: Minimal
Grade system explained: No
Ascent and/or Decent provided: Yes
Driving directions provided: Yes
Date walks last reviewed provided: No
A summary of walks provided: Yes
Regional Map of walks provided: Yes
Maps designed for walking: Yes - reasonable detail
Type of maps used (for walking): Sketch
Colour used in walking maps: Simple colour
Size of walking maps: Full page
Walking map Comment: Most walks have a unique map.
Colour depth of photos: None
Level of detail in tracknotes: Detailed route information
Alternate route and side trip suggestions: Some walks
Bushwalking In The Mount Warning Region
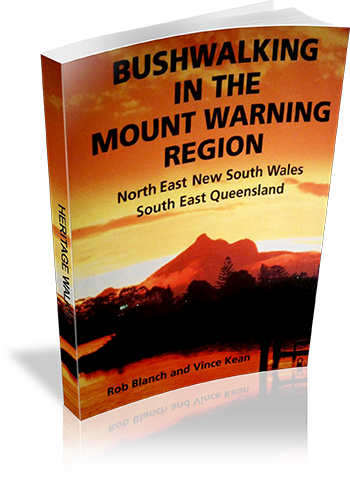
Author: Rob Blanch,Vince Kean
Edition: 1
Publisher: Kingsclear Books
ISBN: 0908272359
Number of pages: 171
Year of Publication: 1989
Cover Price (au$): 14.95
Format: Paperback
Website: http://www.kingsclearbooks.com.au/index.html
Weight (grams): 110
Regions the book covers: North East NSW, South East QLD
Height (cm): 20
Subjects:
Hiking - New South Wales - Warning, Mount, Region - Guidebooks,Hiking - Queensland - Lamington National Park - Guidebooks,Hiking - New South Wales - Tweed River Region - Guidebooks,Tweed River Region (N.S.W.) - Guidebooks,Lamington National Park (Qld.) - Guidebooks,Mount Warning Region (Qld.) - Guidebooks
Interpretive Information: Detailed
Grade system explained: Yes
Ascent and/or Decent provided: No
Driving directions provided: Yes
Date walks last reviewed provided: No
A summary of walks provided: Yes
Regional Map of walks provided: Yes
Maps designed for walking: Yes - reasonable detail
Type of maps used (for walking): Detailed Topographic
Colour used in walking maps: Black and White
Size of walking maps: Full page
Walking map Comment: Detailed maps for most walks, but author recommendsadditional maps which are required.
Colour depth of photos: None
Comment on Photographs: Sketch illustrations are used in the interpretive section.
Level of detail in tracknotes: Detailed route information
Bushwalking in the Katoomba and Leura Area : a selection of short and long walks in the Jamison Valley
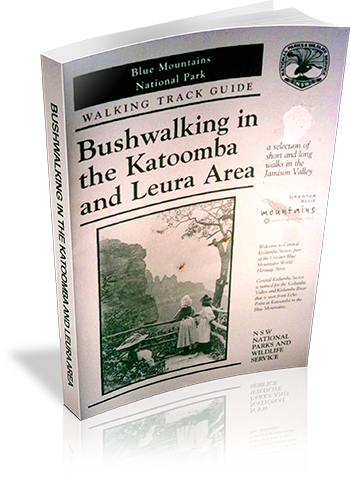
Author: Stephen Alton
Edition: 1
Publisher: NSW National Parks and Wildlife Service
ISBN: 0731091914
Number of pages: 28
Year of Publication: 2005
Cover Price (au$): 6.00
Format: Paperback
Website: http://www.environment.nsw.gov.au/nationalparks/
Weight (grams): 75
Regions the book covers: Katoomba, Leura
Height (cm): 21
Subjects:
National parks and reserves - New South Wales - Blue Mountains - Guidebooks,Nature trails - New South Wales - Blue Mountains National Park - Guidebooks,Blue Mountains National Park (N.S.W.) - Guidebooks
Interpretive Information: Plenty
Grade system explained: Yes
Ascent and/or Decent provided: No
Driving directions provided: No
Date walks last reviewed provided: No
A summary of walks provided: No
Regional Map of walks provided: Yes
Maps designed for walking: Yes - limited detail
Type of maps used (for walking): Sketch
Colour used in walking maps: Multicolour
Size of walking maps: Full page
Walking map Comment: Black and white sketch maps through the book, and an A3 multicolour liftout map also provided. Additional maps required for many walks.
Colour depth of photos: Black and White
Comment on Photographs: Two location photographs, and one historic photograph provided, in addition to a number of pictographs of flora and fauna.
Level of detail in tracknotes: General route description
Blue Mountains National Park Walking Track & Visitor Guide : The Nature Track : Valley of the Waters
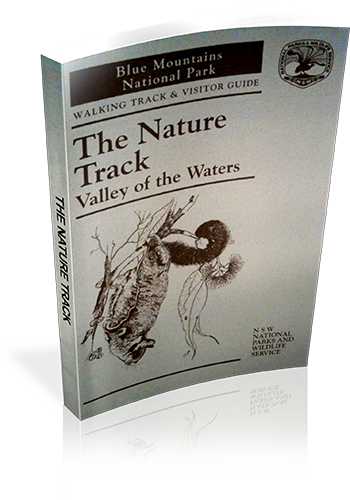
Author: Stephen Alton
Edition: 1
Publisher: NSW National Parks and Wildlife Service
Number of pages: 11
Year of Publication: 1995
Format: Paperback
Website: http://www.environment.nsw.gov.au/nationalparks/
Weight (grams): 15
Regions the book covers: Valley of the Waters
Height (cm): 21
Subjects:
National parks and reserves - New South Wales - Blue Mountains - Guidebooks,Nature trails - New South Wales - Blue Mountains National Park - Guidebooks,Blue Mountains National Park (N.S.W.) - Guidebooks
Overview of Book:
This is a short pamphlet which outlines the points of interested along the Nature Track.
Interpretive Information: Detailed
Grade system explained: Yes
Ascent and/or Decent provided: No
Driving directions provided: No
Date walks last reviewed provided: No
Maps designed for walking: Yes - reasonable detail
Type of maps used (for walking): Sketch
Colour used in walking maps: Black and White
Size of walking maps: Full page
Colour depth of photos: None
Comment on Photographs: Pictograms of flora and fauna.
Level of detail in tracknotes: Overview only
Alternate route and side trip suggestions: None
120 walks in New South Wales
Author: Tyrone Thomas
Edition: 1
Publisher: Hill of Content
ISBN: 0855722975
Number of pages: 393
Year of Publication: 2000
Cover Price (au$): 32.95
Format: Paperback
Website: http://web.archive.org/web/20041010022224/members.ozemail.com.au/~tyronet/100nsw.html
Weight (grams): 315
Regions the book covers: New South Wales
Height (cm): 18
Subjects:
Hiking -- New South Wales -- Guidebooks,New South Wales -- Guidebooks
Niche: Many walks scattered throughout NSW, including Lord Howe and Norfolk Islands
Interpretive Information: Minimal
Grade system explained: No
Ascent and/or Decent provided: No
Driving directions provided: No
Date walks last reviewed provided: Yes
A summary of walks provided: Yes
Regional Map of walks provided: No
Maps designed for walking: Yes - reasonable detail
Type of maps used (for walking): Simple Topographic
Colour used in walking maps: Greyscale
Size of walking maps: Full page
Walking map Comment: Individual maps for most walks.
Colour depth of photos: Colour
Comment on Photographs: There are a few photo plates scattered through the book.
Level of detail in tracknotes: Detailed route information
Alternate route and side trip suggestions: Some walks
Six Foot Track
Six Foot Track

3 Days

44.8 km

2066
Hard track


Six Foot Track
Individuals and family groups do not need to book for the walk, however large groups such as School groups should be registered via recreation@lands.nsw.gov.au Please provide contact details, basic itinerary, dates, number of students or people and teachers or leaders. Bookings are recommended for larger campgrounds on the Great North Walk and Hume and Hovell Walking Track, especially in peak periods (refer to your map kit for contact details). You should always inform a responsible person of your walking itinerary.
Crown Lands is the state government agency within the NSW Department of Trade & Investment, which manages and maintains the Six Foot Track (as well as others including the Great North Walk and the Hume & Hovell Walking Track). They sell a detailed map kit for the Six Foot Track scaled at 1:50k with 100m contour intervals, containing track notes, walking times & distances, points of interest, history, flora & fauna, as well as safety tips. The kit is available for $10 (plus $2 postage & handling), with proceeds from all of their map kit sales supporting ongoing maintenance of the tracks.
To order their Six Foot Track Map Kit, or for other tracks & trails, telephone the Bookshop on (02) 4931 6666 (8.30 am–4.30 pm, Monday to Friday) or email mineralpublication.orders@dpi.nsw.gov.au or complete the order form (PDF 80kb) and post to Bookshop, NSW Department of Trade & Investment, PO Box 344, Hunter Region Mail Centre, NSW 2310. Wholesale and retail outlets should contact the bookshop direct for discounted prices. More info.
Free Beacon Hire
A Personal Locating Beacon is a hand-held device that, when triggered, sends a message to the emergency services with your location. The emergency services staff can then look at your trip intention forms and decide how best to help you. In the Blue Mountains, you can hire these for no charge, just complete this Trip intention form, and a borrowing form. The device can be picked up from:
NPWS Office – Govetts Leap Rd Blackheath – 9am to 4pm 7 days Ph: 02 4787 8877
Katoomba Police Station – 217 Katoomba St Katoomba – Anytime Ph: 02 4782 8199
Springwood Police Station – 4 Jerseywold Avenue Springwood – Anytime Ph: 02 4751 0299
More info.
Explorers Tree (Katoomba)

In 1813, the explorers Gregory Blaxland, William Wentworth and William Lawson, on their historic crossing of the Blue Mountains, engraved their names not only into the history books, but also reportedly into this tree on the side of Pulpit Hill. The tree now long dead was caged[ref img=410771] in 1884 in an attempt to preserve the engravings[ref img=410762]. The engravings are no longer visible[ref img=410765] and there is even debate over the last 100+ years as to the authenticity of the engravings[ref url=http://www.bmcc.nsw.gov.au/download.cfm?f=6276E028-AE40-9F6C-B406E1974B00D050].
Explorers Tree

300 m
5 mins
8m
-6m
###road###
From the ‘Explorers Tree'[ref img=410771] (at the intersection of Nellies Glen Rd and the Great Western Hwy), this walk follows the ‘Six Foot Track – 200m’ sign[ref img=410783] up along the sealed Nellies Glen Rd[ref img=410795] for just over 200m before turning left at another ‘Six Foot Track’ sign[ref img=410813]. Here the walk comes to a dirt car park[ref img=410810] and shelter[ref img=410822] with a large ‘Six Foot Track’ information sign[ref img=410825].
Six Foot Track Info Shelter
500 m
12 mins
2m
-68m
###servicetrail###
Continue straight: From the shelter and car park (on Nellies Glen Rd), this walk follows the ‘Six Foot Track’ sign[ref img=410849] around the lower locked metal gate to follow the management trail gently downhill[ref img=410858]. The walk continues down this trail, which becomes fairly steep in places, for about 500m. Here the trail flattens out and comes to an intersection marked with a couple of ‘Six Foot Track’ signs[ref img=410954] and a ‘Nellies Glen Bushland Restoration’ sign[ref img=410969].
Int of 6 Foot Track and Norths Lookout Trail
200 m
6 mins
1m
-32m
###bushtrack###
Continue straight: From the intersection[ref img=410954], this walk heads through the gap in the large metal gate, over a small rise. The fairly narrow track soon leads down a series of timber steps[ref img=449053], past some nice views for just shy of 150m to come to a faint intersection with a track (on your left), marked with a ‘Bonnie Doon Fauna Study’ sign[ref img=449074].
Continue straight: From the intersection, this walk follows the track downhill towards the open views[ref img=449059]. After about 50m the track comes to the fenced[ref img=449104] and signposted ‘Norths Lookout'[ref img=449095] with great views over Nellie’s Glen and into the valley[ref img=449110]. At the end of this side trip, retrace your steps back to the main walk then Veer left.
Int of Six Foot Track and Norths Lookout Trail
1.6 km
44 mins
26m
-337m
###bushtrack###
Turn right: From the intersection, this walk follows the ‘Six Foot Track’ sign[ref img=410957], fairly steeply down the management trail past the ‘Nellies Glen’ metal plaque[ref img=410978] and, about 10m later, past the timber ‘Nellies Glen’ sign. After another 80m, the trail narrows and this walk turns left to head through the green timber chicane with the ‘Caution – Steep Decent’ and ‘Pedestrian Access only’ signs[ref img=411017]. As the sign suggests, this walk now leads steeply down the Nellies Glen canyon steps[ref img=411059] for about 300m, passing alongside the tall rock walls[ref img=411056] and crossing the usually small creek a few times before bending distinctly left to cross below a small set of falls (below the main Bonnie Doon Falls)[ref img=411158]. Here the track mostly flattens out[ref img=411266] and leads along the side of the gully for another 400m to pass a ‘Blue Mountains National Park’ sign[ref img=411287], then just over 100m later, passes another sign marking the lower end of ‘Nellies Glen'[ref img=411326]. About 600m after this sign, the track bends to cross a narrow gully then leads up to a small clearing at the northern end of the wide Nellies Glen trail.
Int at Lower Nellies Glen
2 km
36 mins
14m
-102m
###managementtrail###
Veer left: From the clearing, this walk follows the wide trail gently downhill[ref img=411566] while keeping the valley to your right. The trail leads generally downhill through the scribbly gum forest[ref img=411542] for about 1.4km to then cross the culverted[ref img=411593] Devils Hole Creek – just past the creek is an unused concrete pipe[ref img=411602] with wild bee hives[ref img=411605] inside. This walk continues along the trail for another 500m to an intersection with the Devils Hole Trail[ref img=411677] (on your left), marked a ‘Six Foot Track’ and a ‘Ladders have been removed’ sign.
Int of Nellies Glen Rd Trail and Devils Hole Trail
100 m
1 mins
1m
0m
###servicetrail###
Continue straight: From the intersection, this walk walk follows the ‘Six Foot Track’ sign[ref img=411671] along the Nellies Glen trail, to cross the culverted Diamond Creek[ref img=411698] to then come pass alongside the old Megalong ‘Village site'[ref img=411734] and horse paddock[ref img=411707] (which is on your left).
Megalong Village (Historic)

In 1870, kerosene shale was discovered in the area surrounding the upper end of Megalong and Diamond Creeks so in 1885, Mr J. B. North started to mine the resource. The mine continued for nearly 10 years. During the life of the mine, the Megalong Village grew to to a small town with a hotel, butchery, bakery, public hall and around about 40 families[ref img=411734]. When the mines were closed in 1904, the best buildings were demolished and rebuilt in Katoomba. In the December of 1904, a huge bushfire ripped up through the valley destroying what buildings were left. Now the area is private land with a horse paddock[ref img=11249] with a view of the escarpment behind. A small bronze sign marks the site[ref img=411731] .
Megalong Village site
1.1 km
18 mins
8m
-23m
###servicetrail###
Continue straight: From the beside the historic Megalong ‘Village site'[ref img=411734], this walk heads along the wide trail, initially keeping the horse paddock[ref img=411707] and view to the escaprment to your left after just shy of 250m this walk heads through a usually closed gate[ref img=411773] and continues gently undulating along the trail through the tall scribbly gum forest[ref img=411809] for 500m, crossing a usually small creek[ref img=411800] to then pass a 6FT ’40km’ arrow post[ref img=411836]. About 400m further along this trail, soon after crossing the usually small Corral Creek[ref img=411878], this walk comes to a T-intersection[ref img=411884], where a ‘Six Foot Track’, sign[ref img=411887] points back along the trail, and where there are some power lines[ref img=411899] to your right.
Intersection of Medlow Gap Management Trail and 6 Foot Track
1.5 km
26 mins
21m
-39m
###servicetrail###
Veer right: From the intersection, this walk heads west along the Nellies Glen Road trail, initially keeping the power lines to your right. After about 170m this walk veers right at the locked ‘Wari-Wari’ gate[ref img=411941] to climb the fence using a stile [ref img=411929]. The walk continue along the (now public) dirt Nellies Glen Road, for 900m passing a series of driveways[ref img=412031], to rejoin then power lines[ref img=412100] for 120m passing just below a nearby house[ref img=412127]. Here the road leads downhill for 200m to pass a large ‘Road subject to flooding…’ sign[ref img=412166] then just 100m later this walk comes to an intersection with ‘Six Foot Track’ sign and stile[ref img=412193] (just before the road bends right to cross Megalong Creek[ref img=412184]).
Megalong Ford
1.1 km
22 mins
40m
-21m
###bushtrack###
Continue straight: From the intersection, this walk follows the ‘Six Foot Track’ sign[ref img=412193] over the fence using the stile[ref img=412196]. A sign reminds walkers to stay on the track as this section is on private property[ref img=412199]. The walk leads through mostly open farmland for 130m passing a ‘Private Land No Camping’ sign[ref img=412217] to then cross Mitchells Creek[ref img=412238], this creek may become impassable after heavy or prolonged rain. Over the next 300m the trail leads over a rise[ref img=412298] through the farmland to then cross a fence using a stile on the right[ref img=412304]. The track now leads through a denser forest for another 300m to cross ‘McLennan Bridge'[ref img=412367], named after Mr Michael (Mick) McLellan who has been in charge of the maintenance of the 6FT for many years. Just shy of 150m after the bridge this walk continues straight at a four-way intersection[ref img=412394] for another 200m to cross a fence using a stile[ref img=412451]. Here the walk crosses the sealed Megalong Rd, to find a car park[ref img=412481] beside a clearing[ref img=412499] and several ‘Six Foot Track’ signposts[ref img=412484] (about 400m south of Megalong Creek).
Old Ford Reserve
Old Ford Reserve campsite is a few meters north of the Megalong Rd bridge over Megalong Creek. The campsite is accessible by car, has a (wheelchair accessible) toilet, and plenty of flat space to pitch a tent. Some nice groupings of trees and access to the creek makes this an OK place to stay. Been on the side of the road this campsite does attract some load campers at times. The campsite is about 500m north of the Six Foot Track crossing point at Megalong Rd.
Int of 6 Foot Track and Megalong Rd
100 m
2 mins
0m
-5m
###servicetrail###
Continue straight: From the car park on Megalong Road (about 400m south of Megalong Creek), this walk follows the ‘Six Foot Track’ sign[ref img=412484] over the cattle grate[ref img=412490] or stile[ref img=412517] and goes beside the large sheltered ‘Six Foot Track’ information sign[ref img=412502]. Here the walk heads gently downhill along the dirt road[ref img=412562] for about 80m to come beside a stone memorial[ref img=412580], marking ‘Megalong Cemetery'[ref img=412589] (on your left).
Megalong Cemetery (historical)
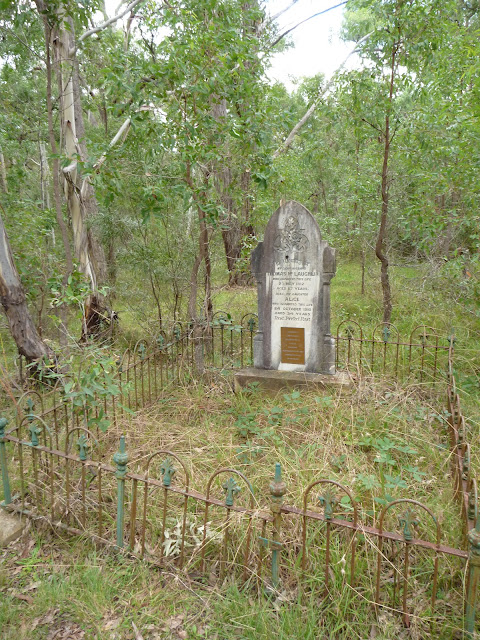
The Megalong Cemetery became the final resting place for at least 14 people who died between 1894 and 1931[ref img=412589]. Many of the grave sites[ref img=412598] are in poor repair or can no longer be easily found – please take care in the area to avoid any further damage. A tall stone monument[ref img=412583] marks the edge of the cemetery on the Six Foot Track, about 100m west of Megalong Road. This cemetery is currently under the management of the Blue Mountains City Council, and is recognised by the National Trust.[ref url=http://www.bmcc.nsw.gov.au/download.cfm?f=99272862-AE40-9F6C-B2579610E7F9EE1D]
Megalong Cemetery
800 m
15 mins
14m
-34m
###servicetrail###
Continue straight: From beside ‘Megalong Cemetery'[ref img=412589], this walk heads gently downhill along the dirt road[ref img=412580] for about 80m to pass through gate with a ‘No Through Road’ sign[ref img=412613]. Just shy of 300m later, this walk passes a few driveways, beside the farmland[ref img=11369] to cross another cattle grate[ref img=412652]. Then about 150m later, the road leads close to Megalong Creek[ref img=412670], where a sign reminds visitors this is private land[ref img=412667]. About 30m further on, the main dirt road veers right at a Y-intersection[ref img=412676] then crosses a cattle grate[ref img=412682]. Here the walk heads uphill along the dirt road for just over 200m (with views of the escarpment behind[ref img=412700]) to cross another grate and come to an intersection marked with a ‘Six Foot Track’ sign pointing right into the valley[ref img=412715].
Int Near Guyver Bridge
1.9 km
41 mins
69m
-122m
###bushtrack###
Turn right: From the intersection, this walk follows the ‘Six Foot Track’ sign[ref img=412727] downhill along the narrow track into the valley. The walk now crosses a small creek on the timber ‘Guyver Bridge'[ref img=412742], named in honour of Jon Guyver who worked hard to redevelop the 6FT as the track coordinator/administrator until 2010. Here the walk heads up the timber steps[ref img=412748] and over a rise[ref img=412766]. The track now follows a wire fence down through the farmland[ref img=412772] and across a valley (above a dam) for almost 100m to metal stile just before a dirt trail[ref img=412784]. Here the walk turns right and crosses the fence using the stile[ref img=412790], then follows a ‘Six Foot Track’ sign along the track as it undulates over a series of hills[ref img=412799] for about 300m before crossing another fence using another metal stile[ref img=412856] beside a large tree. The track now leads uphill for 200m to pass a ‘Private Land – No Camping before Coxs River Reserve’ sign[ref img=11411], then winds along the side of the hill for a further 150m before heading into a wooded forest and down some timber steps[ref img=412922]. The walk then crosses a steep gully and winds along the side of the hill for just over 100m to pass a ’35km’ 6FT arrow post[ref img=412946], then 150m later, crosses another fence using a metal stile[ref img=412961]. Here the walk continues for another 600m through a mix of farmland and open forest, crossing a few more steep gullies with timber steps to head through a closed gate[ref img=413066], marked with a few ‘Private Property’ signs[ref img=413075].
Private Gate
3.4 km
1 hr 25 mins
157m
-348m
###bushtrack###
Continue straight: From the gate, this walk heads downhill along the narrowing track, keeping the valley to your right. After about 120m, this walk crosses a timber fence on a metal stile[ref img=413105], then continues down the track over a few large rocks for just over 200m, to an intersection with a wide trail. Here the walk turns right then immediately left[ref img=413162], to continue along the track as it narrows again. The track then leads down along the side of the valley for about 600m and passes through another usually closed gate[ref img=413270], then about 250m later, the track passes a few granite boulders[ref img=413315] and heads down a few timber steps. About 400m after this, this walk heads down a 100m-long series of timber steps[ref img=413378] to cross a gully and find a series of large granite boulders[ref img=413417] – one of the small overhangs is home to a wild bee hive[ref img=413420]. The track leads out of the valley and gently down along the side of the hill for about 1km, where the valley opens up with wider views down to the Coxs River[ref img=413543], then heads down some more timber steps[ref img=413567]. About 250m later, the track leads down another set of timber steps[ref img=413600] to then head through a pleasant lush gully with views close to the river[ref img=413630]. The track then heads along the hillside for another 150m to an intersection (just above the swing bridge, to your right), marked with a ‘Six Foot Track’ and ‘Alternative Bridge’ signs[ref img=413672].
Bowtells Swing Bridge
This suspension footbridge[ref img=413975] spans the Coxs River and provides an alternate route for the Six Foot Track when the river is in flood[ref img=413915]. Regardless of weather, this route is now becoming more popular with many walkers, wanting to avoid the river crossing. The bridge was built and opened in 1992 by the Royal Australian Engineers. The bridge is named after a fellow soldier of the builders, Corporal Bob Bowtell, who suffocated and died in foul air whilst attempting to clear a tunnel of the VC during the Vietnam war [ref isbn=1865088234 page=37]. Bowtell grew up in Katoomba and is now buried in West Malaysia.
Bowtells Swing Bridge
1.1 km
25 mins
46m
-74m
###bushtrack###
Continue straight: From the intersection just above above Bowtells Swing Bridge[ref img=413897], this walk follows the ‘Six Foot Track’ sign[ref img=413672] along the clear track keeping the main valley to your right. After about 30m the track passes an intersection with another track (to the bridge[ref img=413690]) then continues along the side of the hill for about 800m crosses several gullies [ref img=413711] to come an intersection with a trail beside a short timber fence[ref img=413798]. The walk continues beside this fence for about 70m to then turn right to follow the ‘Six Foot Track’ sign[ref img=41481] moderately steeply down the embankment. Here the walk leads down across the open floodplain[ref img=41478] to the bank of the Cox’s River[ref img=413840].
Continue straight: From the clearing and floodplain[ref img=413840], this walk
crosses the river that may flow in two or three sections[ref img=413864] across smooth and slippery rocks. This river becomes impassable when in flood[ref img=414416], the river is normally only shin deep, if deeper consider using the swing bridge upstream. Once on the sandy beach on the far side, this walk follows the wide trail uphill for about 40m to the intersection marked with a ‘Six Foot Track’ sign[ref img=414416], where the Coxs River Campsite is just up to the right. Now Veer right to rejoin the main walk .
Bowtells Swing Bridge
100 m
4 mins
15m
-8m
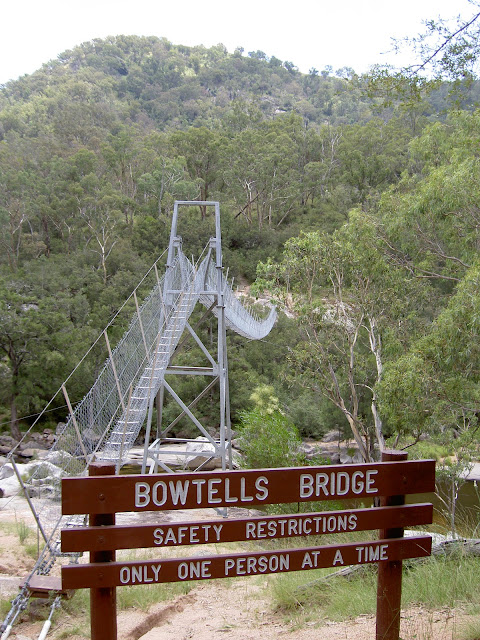
###duckboard###
Turn right: From the intersection, this walk follows the ‘Alternative Bridge When River High’ sign[ref img=413672] down the timber steps[ref img=413675] to the southern end of the ‘Bowtells Bridge'[ref img=41511]. Here the walk climbs the ramp and crosses the Cox’s River on the suspension bridge[ref img=41511], observing the ‘Only one Person at a time'[ref img=11486] safety sign. This crossing can take some time with a large group – the bridge does swing a fair bit and people concerned by heights may find this challenging. The bridge spans 100m, giving great views of the river below[ref img=41520]. On the far side, this walk steps off the bridge onto the large rock platform[ref img=414014].
Bowtells Bridge West
800 m
20 mins
49m
-73m
###bushtrack###
Continue straight: From the north side of the bridge, this walk heads up the timber steps through the dense forest[ref img=414017] to soon pass the ‘Bowtells Bridge’ sign[ref img=414020]. At the top of these steps, the track bends left then leads along the side of the hill for 500m, crossing a few gullies[ref img=414035] and undulating up and down a series of timber steps to then pass between a couple of fences posts[ref img=414110]. Here the walk continues down a series of timber steps[ref img=414137] to a clearing and intersection marked with a ‘Private Land – No Camping’ sign[ref img=414131].
Turn sharp right: From the intersection and clearing, this walk follows the ‘Camping Ground-500mtrs’ sign[ref img=414134] north up the timber steps. The track soon bends left and follows the side of the hill[ref img=414167] for about 130m to then head through a gate with a ‘Welcome’ sign[ref img=414173]. The walk continues along the clear track for another 70m to the intersection with the timber path[ref img=414197] just below the ‘Six Foot Track Lodge'[ref img=414272].
Six Foot Track Lodge
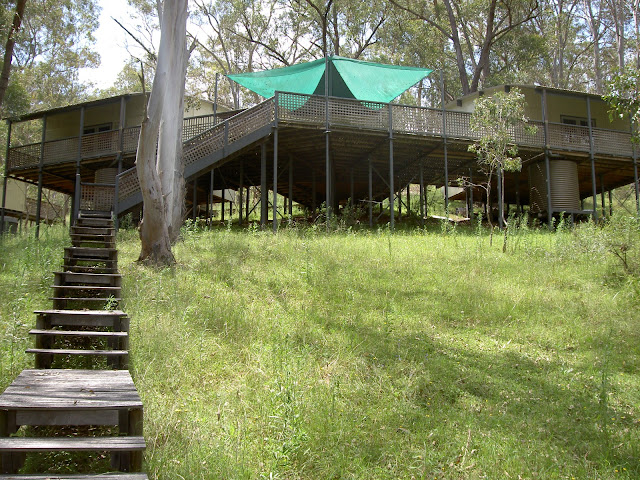
The Six Foot Track Lodge is situated above the flats of the Coxs River along the Six Foot Track alternate route, not far north of Coxs River Campsite. The lodge consists of two cabins, each with the capacity to sleep twelve people in bunks[ref img=414227]. The cabins are equipped with linen, warm blankets, log fire[ref img=414221], pizza oven[ref img=414242], tank water[ref img=414248] and has its own outhouse toilet[ref img=414254]. At $35[ref url=http://www.6fttracklodge.com/book/book.html] per person per night, this is a very pleasant way to spend an evening. Meal packs can also be organised for a fee. For more information, visit www.6fttracklodge.com or call Willi-Joy Sirks (owner) 0415 523 041. All bookings must be made before commencing your walk (the cabin is not staffed).
Six Foot Track Lodge
400 m
8 mins
7m
-19m
###bushtrack,servicetrail###
Continue straight: From the intersection below the ‘Six Foot Track Lodge'[ref img=414206], this walk follows the clear track west initially keeping the lodge up to your right. After about 30m this walk crosses a gully[ref img=414287] then climbs over a fence using stile[ref img=414296]. Here the walk turns right and follows the track for almost 50m to a T-intersection[ref img=414305] with a wide trail, beside a private property gate[ref img=414311] and marked with several ‘Six Foot Track’ signs[ref img=414305].
Veer left: From the intersection, this walk follows the ‘Camping Ground-200m’ sign[ref img=414308] gently down along wide trail[ref img=414317]. After about 230m the trail flattens out and passes below the main camping area[ref img=414347] marked with a ‘Coxs River Reserve’ sign[ref img=414365]. About 30m past here, this walk comes to a clear intersection with a dirt road marked with a ‘Six Foot Track’ sign[ref img=414410].
Coxs River Campsite

Coxs River Campsite, on the Six Foot Track, is found on the western bank of the Coxs River. It provides a sheltered picnic table[ref img=414368], water (rain tank[ref img=414371] or creek[ref img=414434] – treat before drinking either), toilet[ref img=414386][ref img=414392] and a flat grassed camping area[ref img=414446] with excellent access to the river[ref img=414434]. The campsite is used by people walking the Six Foot Track, but is also visited at times people people camping in 4WD. A nice place to camp. Despite the several fire scares, this is a fuel stove only area no fires allowed[ref img=414353].
Coxs River
The Coxs River starts west of Katoomba, running south-east as the main tributary for the Warragamba Dam. The Six Foot Track crosses the river using on the slippery rounded stones or, when in flood, the large metal Bowtells Bridge. The campsite is located a short distance up the west bank from where the 6FT crosses. The water must be treated before drinking. The river provides some potentially nice swimming spots, with pools and interesting granite rock formations, be very careful if deciding to swim as it can also be a very dangerous.
End of day 1
This is the planned overnight stay for the end of day 1, happy camping.
Coxs River Campsite
3.1 km
1 hr 10 mins
354m
-61m
###servicetrail###
Turn right: From the intersection, this walk follows the ‘Six Foot Track’ sign[ref img=414416] uphill along the dirt road
passing alongside the Coxs River Campsite (which is on your right). After about 150m this walk crosses the usually shallow Gibraltar Creek[ref img=414548] that leads uphill for another 150m to pass close to a high tension power line tower[ref img=414503] (up the hill to your left). The walk continues up along the dirt road for 200m to cross a usually small creek[ref img=414524] then heads under the high tension power lines to cross the usually usually shallow Gibraltar Creek[ref img=414548] again. These creeks may become impassable after heavy or prolonged rain, they also often dry up. From here the dirt road winds moderately steeply uphill for about 2.1km where it then passes around a left hand hairpin bend to pass another ‘Drive With Caution Walkers On Road’ sign[ref img=414875] (where there is also some views to your left). The road leads more gently uphill where it then bends right to lead gently past the top of the Kiangatha Yards[ref img=414917] to cross a cattle grate[ref img=414926] on the dirt road.
Kiangatha Yards
3.1 km
1 hr 14 mins
184m
-190m
###servicetrail###
Continue straight: From beside Kiangatha cattle Yards[ref img=414947] this walk heads north west along the dirt road to cross a small dip and head straight through an intersection and continue for 250m to pass a ‘Grid’ sign[ref img=414959] (facing away). About 140m later this walk pass another ‘Grid’ sign[ref img=414989] then 100m after crosses another cattle grid[ref img=415004]. The walk continues (moderately steeply in places) up the dirt road for 700m where it flattens out mostly[ref img=415091] at a grassy clearing with view of the distant escarpment[ref img=415094] (behind). Here the dirt road leads more consistently and steeply uphill for 300m until suddenly flattening out on at the top of Mini Mini Saddle, beside a large clearing[ref img=415148] (on your left).
Continue straight: From beside the Mini Mini Saddle clearing[ref img=415148], this walk follows the dirt road gently uphill along the side of the hill. The road leads past a open section of forest and starts to head downhill to pass a 6FT ’20km’ arrow post[ref img=415190] about 250m after leaving the clearing. Here the track leads downhill, moderately steeply in places for 900m where the road bends left[ref img=415283] around the edge of a grassy clearing. About 40m further down the road, this walk passes an intersection with the regenerating trail[ref img=415292] (on your right) and continues steeply downhill for just shy of 300m to turn left at the intersection at the other end of the regenerating trail[ref img=415334]. This walk continues more gently downhill along the dirt road for just over 350m until coming to the signposted (and gated) ‘Alum Creek Reserve'[ref img=415388] (on your right).
Alum Creek Camping ground
Signposted as ‘Alum Creek Reserve'[ref img=41289], this fairly flat grassy area[ref img=415430], off the side of the dirt Glen Chee Road, part of the six foot track). The campsite is the least used and least developed of the three official campsites on the Six Foot Track, and makes a good place to stay if attempting the walk in two days. There are no facilities provided but the flat campsite is in a well-protected valley with the small Alum Creek beside the campsite and the fairly reliable Little River down the road (treat water before use).
Alum Creek Reserve
4.2 km
1 hr 32 mins
468m
-54m
###servicetrail###
Continue straight: From ‘Alum Creek Reserve'[ref img=415388], this walk follows the dirt road downhill for just shy of 100m to cross Alum Creek[ref img=41280]. Here the walk heads up between the two timber posts[ref img=41277] and heads through old farmland[ref img=41271] for about 300m to pass a ‘Drive with Caution Walkers on road’ sign[ref img=415487] (facing away). Over next 300m this walk continues through the old farmland[ref img=415490], then leads beside Little River[ref img=415517] before crossing the usually shallow Little River[ref img=41247]. Just over 100m later this dirt road leads across the river again [ref img=415616], then again after another 110m[ref img=415616]. These creeks may become impassable after heavy or prolonged rain, and may become dry. The dirt road now starts to head uphill for about 300m where it then bends right around a hand hairpin bend then a short distance further up to the ‘Kiangatha’ gate[ref img=41214].
Continue straight: From here, this walk heads up through the Kiangatha Gate[ref img=41214] and continues walking fairly steeply uphill along the dirt road. After about 500m the road leads around a left hand hairpin bend[ref img=415766] then 150m later the road briefly flattens out beside a large flat clearing (on your left)[ref img=415796]. The walk continues steeply uphill for 800m to walk past a ‘Drive with Caution Walkers On Road’ sign[ref img=415907] (facing away) to come to a Y-intersection with the signposted ‘Waterfall Creek Fire Trail'[ref img=415913] (on your right).
Turn left: From the intersection, this walk follows the arrow on the metal post quiet steeply uphill along the dirt road. After about 400m this walk passes a ’20km’ 6FT arrow post[ref img=415970] then about 150m later the road flattens out briefly to pass a clearing on the top of the ridge (on your left)[ref img=415991]. The dirt road continues to wind fairly steeply uphill for another 700m with some distance views of the escarpment[ref img=416096] behind before passing around a sharp left hand hair pin bend[ref img=41136]. Just shy of 150m later this walk comes to a clearing at the top if Black Range, marked with a few 6FT signs and the intersection with the signposted ‘Cronje Mountain Fire Trail'[ref img=416165].
Int. Black Range Rd and Cronje Mtn Fire Trail
2.1 km
38 mins
103m
-24m
###servicetrail###
Veer right: From the intersection, this walk follows the ‘6`t’ arrow on metal pole generally west along main dirt road that follows the top of the ridge line. The dirt road undulates along the ridge line for 2.1km, moderately steeply in a few places through a wooded forest and past a few large ant mounds[ref img=14560] until leading up to the signposted intersection with ‘Moorara Boss Fire Trail'[ref img=416327] (on your left).
Int. Black Range Rd and Moorara Boss Fire Trail
3.2 km
57 mins
118m
-32m
###servicetrail###
Continue straight: From the intersection, this walk follows the ‘6`t’ arrow on metal pole[ref img=14506] west and uphill along the main dirt road that follows the ridge line. After about 100m this walk heads past a small dam on the side of the road[ref img=416342] then continues along the dirt road as it gently undulates through the pleasant open forest for 2.3km before heading up a short steep section[ref img=416528]. About 900m from the top of this steep section the road leads fairly gently up to and intersection with the signposted ‘Warlock Fire Trail'[ref img=416612] (on your left).
Int. Black Range Rd and Warlock Fire Trail
3.1 km
51 mins
82m
-13m
###servicetrail###
Continue straight: From the intersection, this walk follows the arrow on the metal ‘6`T’ post west along the main dirt road. After just shy of 100m this road splits in two for a short distance[ref img=416624] then almost 400m later this walk comes to an intersection with the signposted ‘Beefsteak Creek Fire Trail'[ref img=416666] (on your right).
Continue straight: From the intersection, this walk follows the ‘6`t’ arrow on a metal post north west, uphill along the main dirt road. Soon the road leads up a short steep rise then leads more gently as it undulates along the ridge for 400m to pass straight ahead at an intersection marked with a metal ‘Kanangra Boyd National Park’ sign[ref img=416708]. This walk continues along the main dirt road for another 1.2km to pass a short trail (on your right, that leads into a clearing that has been used as a campsite[ref img=416792]). Here the dirt road continues gently uphill for 500m to find an intersection[ref img=416837] with a faint trail (on the left), just before the clearing and pine forest[ref img=416840].
Continue straight: From the intersection[ref img=416837], this walk heads north and gently uphill along the main trail, towards the clearing. After about 80m the dirt road leads past a ‘Black Range Fire Trail’ sign[ref img=416846] then about 25m later comes to the edge of the clearing and intersection with another trail[ref img=416855]. Here the walk continues straight and gently up along the main dirt road for 400m as the road bends right to a T-intersection on the edge of the pine forest [ref img=416894], marked with a ‘6`t’ metal arrow post[ref img=14392].
Black Range Rd
400 m
8 mins
0m
-28m
###servicetrail###
Turn left: From the intersection, this walk follows the ‘6`t’ metal arrow post[ref img=416897] downhill along the dirt road keeping the main pine forest to your right[ref img=416915]. After about 250m this walk comes to a clear four way intersection[ref img=416966] marked with several ‘Six Foot Track’ signs[ref img=416978][ref img=416975], and some power lines on your left.
Turn left: From the intersection, this walk follows the ‘Six Foot Track – Black Range Camping Ground’ sign[ref img=416975] gently downhill and some under power lines[ref img=416972] along the dirt road. After about 50m this walk heads past a ‘Drive With Caution Walkers On Road’ sign[ref img=416990] then another 50m later comes to an information sign in front of the ‘Black Range Camping Ground'[ref img=416999] (on your right).
Black Range camping ground
Black Range camping ground is found along the Six Foot Track, and is also accessible by car. The well maintained and signposted[ref img=416999] campsite has a couple of sheltered picnic tables[ref img=417014], toilets[ref img=417029][ref img=417044], rainwater tank[ref img=417014] and and information board with map[ref img=416999]. The campsite is in a large fenced grassy area[ref img=417023]. The tank water is quiet reliable but the tank can become empty during long dry spells or through vandalism, please treat before use. A sign reminds campers that this is a Fuel Stove Only area – no camp fires[ref img=417011]
End of day 2
This is the planned overnight stay for the end of day 2, happy camping.
Black Range Campsite
3 km
1 hr 5 mins
141m
-123m
###servicetrail###
Continue straight: From the information sign in front of ‘Black Range Camping Ground'[ref img=416999], this walk follows the dirt road gently downhill initially keeping the campsite to your right[ref img=416996]. After about 100m this walk leaves the edge of the campsite and comes to an intersection with a management trail (on your left), marked with a 6FT arrow post[ref img=417089].
Continue straight: From the intersection, this walk follows the 6FT arrow post gently downhill (south west) along the management trail[ref img=417086] through the tall wooded forest. After almost 200m this walk passes a ’10km’ 6FT arrow post[ref img=417107] then about 400m later the trail bends right and heads more steeply downhill[ref img=417143] for about 200m where the trail bends left to cross a ferny gully (the upper reaches if Bulls Creek)[ref img=417164]. The walk continues along the trail heading uphill past a few more 6FT arrow posts[ref img=417200] for about 500m to a clearing at the top of the ridge[ref img=417209]. Here the trail bends and leads downhill through tall eucalypt forest with some pine trees[ref img=417224] for 250m to veer left at an intersection with a faint trail (on your right)[ref img=417245]. The walk now continues up the moderately steep hill[ref img=417248] keeping the valley on the left for just shy of 300m to then head up a notably steeper section of trail[ref img=417284] with a few Telsta posts[ref img=417290] for about 250m. About 40m from the top of this climb the walk comes to a clear intersection with a trail (on your right), marked with 6FT arrow post[ref img=417332].
Continue straight: From the intersection, this walk follow 6FT arrow post south west[ref img=417332] gently downhill along the clear trail. After about 50m the trail bends right then leads fairly steeply downhill[ref img=417350] for 250m to a pleasant gully[ref img=417386]. The trail then gently undulates along the side of the hill for 300m to find a T-intersection, marked with a 6FT arrow post (pointing right)[ref img=417425].
Veer right: From the intersection, this walk follows the 6FT arrow post[ref img=417425] gently uphill along the trail heading north west. After about 120m this trail bends left (at a large grassy clearing[ref img=417449]) then just over 100m later the trail passes a ‘Road Ahead’ sign[ref img=417467] and comes to a larger clearing and gravel stock pile[ref img=417467] beside the sealed Jenolan Caves Rd[ref img=417470],
Int of 6 ft track and Jenolan Caves Rd
2.4 km
49 mins
82m
-102m
###bushtrack###
Continue straight: From the clearing and gravel pit[ref img=417467], this walk crosses Jenolan Caves Road[ref img=417473] (take care with traffic) veering a little left to follow a 6FT arrow post[ref img=417485] along the narrow track. Here the track leads past a ‘Road Ahead’ sign[ref img=417494] (facing away) and winds gently along the side of the hill for about 300m before turning right, following a 6FT arrow post[ref img=417536], down some timber steps[ref img=417551]. After another 40m this walk crosses a ferny gully and small creek on a small flat timber plank bridge[ref img=417560]. Here the walk heads along the side of the gully and up timber steps[ref img=417575] for about 100m before flattening out and heading around the side of the hill for another 200m. Here the walk comes beside the road and heads just behind the safety barrier[ref img=417605] for about 30m before heading around the side of another small hill for 120m. Here the walk turns right and follows another 6FT arrow post[ref img=417632] down some timber steps[ref img=417635] for about 80m to cross another gully on another small flat timber plank bridge[ref img=417659]. The walk now heads up more timber steps[ref img=417665] for about 40m where the track flattens out near the road again[ref img=417668]. Turning right the walk now heads around the side a small hill for 40m before once again turning right and following the 6ft arrow post down timber steps[ref img=417674] across a gully then head up the hill for 130m to the large blue ‘Jenolan Caves Welcome’ sign[ref img=417704].
The track now widens (into an old trail) and follows fairly close to road and power lines for 400m before bending right to lead up over a hill[ref img=417764] for about 600m (passing a ‘5km’ 6FT arrow) to then come down and walk along side of a vegetating clearing[ref img=417839] and come back to the road[ref img=417869]. From here this walk follows the track keeping the road a short distance to your left[ref img=417869] for 150m to an intersection with driveway near a large blue ‘Jenloan Caves Cottages’ sign[ref img=417887].
Jenolan Caves Cottages Administration
500 m
11 mins
17m
-18m
###servicetrail###
Veer right: From the intersection, this walk follows the ‘Cottages’ sign[ref img=417890] along the driveway past the ’20’ km/h speed limit sign, initially keeping the office/house to your left[ref img=417890]. The driveway leads over a small rise then heads downhill for about 300m to pass a toilet block[ref img=417932]. Here the walk stays on the driveway as it bends left[ref img=417947] and continues beside the clearing[ref img=417947] to come beside the cottages[ref img=8297].
Jenolan Caves Cottages

Located 9km from Jenolan Caves by road, Jenolan Caves Cottages offers eight well presented self contained timber cottages for guests to stay in. Each is fully insulated and furnished, with lounge, kitchen, two bedrooms and linen. The is a large flat grassy area in front with often with kangaroos grazing and with a children’s playground. For more information call the Jenolan Caves on 1300 763 311[ref url=http://www.jenolancaves.org.au/contact_us.php]. The cottages have a two night minimum stay and prices are from around $130 per night per cabin[ref url=http://www.thebookingbutton.com.au/properties/jenolancavesdirect].
Jenolan Caves Cottages
3.7 km
1 hr 22 mins
65m
-402m
###servicetrail,bushtrack,footpath###
Continue straight: From beside Jenolan Caves Cottages[ref img=8300], this walk heads gently uphill along driveway[ref img=417977] (initially keeping the cottages to your right) for about 60m to walk around the metal gate beside ‘Six Foot Track’ sign[ref img=417992]. This walk continues along this mostly flat trail for 350m through tall wooded forest to a T-intersection marked with a ‘Kia-ora Hill Fire Trail’ sign[ref img=418049]. This walk turns right and follows ‘Six Foot Track’ sign[ref img=418061] gently down along the trail for about 300m to find a fairly large flat clearing[ref img=418100]. The walk continues along the trail which generally leads downhill along the ridge line for 1.5km to where the trail moves to the side of the steep valley (on your right)[ref img=418268]. The trail begins to become steeper then after 400m the trail leads particularly steeply down along the rocky trail[ref img=418325] for about 600m. Here the trial flattens out on a saddle with a Y-intersection marked with a ‘Six Foot Track’ sign (pointing right) and a ‘Mt George’ sign (pointing ahead)[ref img=418367].
Veer right: From the intersection, this walk follows the ‘Six Foot Track’ sign[ref img=418373] downhill along the narrowing track, keeping the steep wide valley to your right. After about 25m the track leads between two timber posts[ref img=418385] and continues fairly steeply down the side of the valley with glimpses to the cave buildings for 500m where the track flattens out a bit and heads under a solid gum tree leaning over the track[ref img=418466]. The track continues leading downhill for another 300m to cross a narrow saddle and along a very narrow ridge[ref img=418523] where there are good views down to Blue Lake[ref img=418529] (on your left). The track now leads down some timber steps for about 50m to a T-intersection[ref img=418547] with a gravel path where a ‘Six Foot Track’ sign points back uphill.
Turn left: From the intersection, this walk follows the ‘Caves House’ sign[ref img=418556] gently downhill along the gravel path a short distance to an intersection and fenced lookout near ‘Carlotta Arch'[ref img=418571][ref img=418568] (on your left).
Carlotta Arch

Carlotta Arch is a large and spectacular cave remnant overlooking Blue Lake. It is believed that the arch was named in honour of a daughter of a surveyor – General P.F. Adams. Adams is credited with having taken some of the earliest photos at Jenolan.
Carlotta Arch Lookout
400 m
12 mins
21m
-74m
###footpath###
Continue straight: From the fenced lookout near ‘Carlotta Arch'[ref img=418571][ref img=418568], this walk follows the ‘Caves House’ sign gently uphill along the stone path[ref img=418562] with handrail. The path leads over a small rise to a view into another valley. Here the path begins to zig zag fairly steeply downhill for 150m beside the limestone cliffs[ref img=418604] passing views down to Caves House[ref img=418628], past a bench seat[ref img=418607] to a ‘Caves House’ information sign[ref img=418655]. The path continues more gently downhill for another 100m past the ‘Grand Arch’ information sign (and view of the Arch)[ref img=418700] then just over 30m later to the ‘Southside Show Caves’ information sign[ref img=418715]. The path continues down the side of the valley for another 80m to head down some concrete steps to the side of Jenolan Caves Road[ref img=418760], opposite Caves House[ref img=418742], where a ‘Six Foot Track’ sign points up the steps[ref img=418751]. The official end of the Six Foot Track.
Jenolan Caves House

Jenolan Caves House, built in 1898, is a heritage-listed building which houses dining, a variety of accommodation options[ref url=http://www.jenolancaves.org.au/accommodation.php], and other services for visitors to the caves. Jenolan has two licensed restaurants: Trails Bistro is open from breakfast onwards and closes early evening. Trails serves a range of light meals including sandwiches, salads and hot food. Chisholm’s Restaurant is open each morning for breakfast and each evening for dinner from 6.00pm. Essential items and beautiful souvenirs may be purchased from Things Jenolan, located on the ground floor of Caves House. Don’t forget to explore one of the many caves to explore in the area. For more information, call Jenolan Caves on 1300 76 33 11.
Cross sectional view of the Six Foot Trackbushwalking track

Analysis ans summary of the altitude variation on the Six Foot Track

Under this standard, a walk is graded based on the most difficult section of the walk.
| Length | 44.8 km | ||
| Time | 3 Days | ||
| . | |||
| Grade 4/6 Hard track |
AS 2156.1 | Gradient | Very steep (4/6) |
| Quality of track | Rough unclear track (5/6) | ||
| Signs | No directional signs (5/6) | ||
| Experience Required | Moderate level of bush walking experience recommended (4/6) | ||
| Weather | Forecast, un forecast storms and severe weather likely to have an impact on your navigation and safety (5/6) | ||
| Infrastructure | No facilities provided (5/6) |
*This summary of grading information is new and still in testing
Overview of this walk Grading – Based on the AS 2156.1 – 2001
This details are now feature still requires more testing and refining. Please use the ‘Walker feedback’ for report specific issues. Please e-mail Matt if you have any general comments. hope you find it help full.
Some more details of this walks Grading
Here is a bit more details explaining grading looking at sections of the walk
Gradient
14 km of this walk has short steep hills and another 6km is flat with no steps. whilst another 6km has gentle hills with occasional steps and the remaining 1.6km is very step.
Quality of track
20km of this walk follows a clear and well formed tack or tie and another 4.5km follows a rough unclear track. the remaining (3.5km) follows a formed track with some branches and other obstacles.
Signs
21km of this walk is clearly signposted nd another 4.5km has no directional signs. the remamining (2.4km) has directional signs at most intersections.
Experience Required
10km of this walk requires no previous bush walking experience and another 9km requires some bush walking experience. the remaining (8km) requires a leader with a moderate level of bush walking Experience.
weather
Around 25km of this walk is affected by forecast, un forecast storms and server weather events that may impact on navigate and safety, wishlist the remaining 3km forecast un forecast storms and server weather likely to have an impact on your negative and safety.
Infrastructure
14km of this walk has limited facilities ( such as not all cliffs fenced ) and another 11 km is close to useful facilities ( such has fenced cliffs and seats ). whilst another 2.3km has no facilities provided and the remaining 790km limited facilities ( such cliffs no fenced, significant creeks not bridged).


Fire Danger
This walk passes Monaro Alpine fire area which currently has a None rating and No fire ban in place. (Downloaded 45 minutes ago)
This walk passes Southern Slopes fire area which currently has a None rating and No fire ban in place. (Downloaded 45 minutes ago)
Please Note: Each park may have its own fire ban, this rating is only valid for today and is based on information from the RFS Please
check the RFS Website for more information.
| °C (feels like °) | km/h from the – % humidity (as at ) |
| Fri ° | Mostly clear. |
| Sat -5° _ 10° | Mostly sunny. |
| Sun -4° _ 9° | Sunny. |
| Mon -4° _ 10° | Sunny. |
Weather and Climate summary
( detailed weather and climate information here)


Kosciuszko National Park:Link to official closures and fire bans page
Region: South Coast & Highlands Park fees Camping Facilities
Current Park Closure information for Kosciuszko National Park Closure information last downloaded Friday 15th of May 2015 10:00 PM
Island Bend campground partially closed due to maintenance – Island Bend campground (Ends Sunday 1 November)
Partial closure of Island Bend campground due to maintenance. Camp sites are now available at the lower camp at Island Bend in
Kosciuszko National Park. Some sites have been fenced and will remain closed for 6 to 12 months following capping works to ameliorate the asbestos risk and to allow for revegetation. Other sites have been gated or fenced and will remain closed due to ongoing asbestos risks. Please observe all signs and closures. For more information, please contact Andrew Miller at the NPWS Jindabyne Office on 0427 437 391 or visit the NSW National Parks safety page. Download a map of the closed areas.
Munyang Bridge closed (behind power station)
Snowy Hydro have advised that the Munyang Bridge behind the Guthega Power Station at Munyang will be closed to all traffic including pedestrians until further notice. As this bridge gives access to Disappointment Spur, this means that there is no access to Disappointment Spur from the Munyang end. Access is possible from the Whites River end but this requires then turning around and exiting the same way (via Whites River). Penalties apply for non-compliance. For more information, please contact the Project Manager for repairs Mark Kofler from Snowy Hydro on 0418 297255.
Strzelecki Creek Headwaters
Closure for campers at the Strzelecki Creek Headwaters close to the Sentinel. An infestation of Mouse-Ear Hawkweed (Pilosella officinarum) has been detected in the headwaters of Strzelecki Creek. National Parks and Wildlife Service are actively treating this weed as well as searching for other infestation in the area. The closed area is marked with signage, posts and fencing. We apologise for this inconvenience, and we are doing all we can to ensure this weed does not become established in this beautiful area. Penalties apply for non-compliance . For more information, please contact Area Manager, Alpine-Queanbeyan , Anthony Evans on anthony.evans@environment.nsw.gov.au or visit the NSW National Parks safety page for park safety guidelines.
Thredbo Valley track from Ngarigo campground to The Diggings campground closed until midday Monday 18 May – Thredbo Valley track (Ends Monday 18 May)
Section 3 of the Thredbo Valley track from Ngarigo campground to The Diggings campground will be closed until Monday 18 May. Minor track reconstruction and maintenance has been carried out on the track near The Diggings campground and due to the recent rain and snow this work has become very wet and slippery and will need a couple of days to dry out before it is used. There are trees down over the track that will be cleared, during this closure. For more information, please phone Snowy Region Visitor Centre, Jindabyne on (02) 6450 5600 or visit the NSW National Parks safety page for park safety guidelines.

Leave a Reply


Comments