Had the chance to test out the new camera on the weekend. It was only an 8km packless walk (okay so I was the 'in case of emergency'-type person in the group who did carry a day pack, water, first-aid kit, etc.
At any rate, amongst friends who kindly reminded me to take the lense cap off, and a husband who reminded me to turn the camera on, i tested the new camera. I love it already, the photos are amazing compared to my old dead thing. I want to post a few down the bottom, hopefully to pick up some advice (critique away, I am thick skinned!)
Bunya Mountains (aka testing the new camera
Forum rules
Please keep the width of embedded images (using [img] [/img] tags) in this forum to no more than 800 pixels wide (this will avoid them being clipped without notice by most users' window sizes). Attached images can be any resolution so long as the file size is no more than 1 MB (attachments will be displayed by the forums as thumbnails no larger than 800 pixels linked to the full-size image).
Please include a description of the pictures' content so that readers know what they're all about.
For topics focussed on narrative rather than the photos, please consider posting in one of the 'Trip Report' forums instead.
12 posts
• Page 1 of 1
Bunya Mountains (aka testing the new camera
![]() by Kainas » Tue 24 Mar, 2009 8:56 pm
by Kainas » Tue 24 Mar, 2009 8:56 pm
Last edited by Kainas on Thu 26 Mar, 2009 9:12 am, edited 2 times in total.
-

Kainas - Athrotaxis cupressoides

- Posts: 410
- Joined: Mon 24 Nov, 2008 3:31 pm
- Location: The Hunter (Cessnock), Australia
- Region: New South Wales
Re: Bunya Mountains (aka testing the new camera
![]() by Kainas » Tue 24 Mar, 2009 9:00 pm
by Kainas » Tue 24 Mar, 2009 9:00 pm
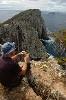
Standard bbq shot
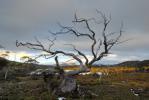
National icon in a tree
I like this shot, I think because it is bright.
- standard bbq shot
National icon in a tree
I like this shot, I think because it is bright.
-
Kainas - Athrotaxis cupressoides
- Posts: 410
- Joined: Mon 24 Nov, 2008 3:31 pm
- Location: The Hunter (Cessnock), Australia
- Region: New South Wales
Re: Bunya Mountains (aka testing the new camera
![]() by Kainas » Tue 24 Mar, 2009 9:05 pm
by Kainas » Tue 24 Mar, 2009 9:05 pm
I really wanted to take this shot, but I couldn't get it to work. I think it would have been a fun shot. It was about 4.30pm and under canopy, so the light was not that good (I had taken my sunglasses off). I had stopped and made myself steady, but I was also rushing because these guys walking, not posing.
I really like this kind of shot.
Had some fun with some sunset shots. Any tricks to avoiding the sun spots?
I really like this kind of shot.
Had some fun with some sunset shots. Any tricks to avoiding the sun spots?
-
Kainas - Athrotaxis cupressoides
- Posts: 410
- Joined: Mon 24 Nov, 2008 3:31 pm
- Location: The Hunter (Cessnock), Australia
- Region: New South Wales
Re: Bunya Mountains (aka testing the new camera
![]() by wello » Wed 25 Mar, 2009 7:50 pm
by wello » Wed 25 Mar, 2009 7:50 pm
One thing that's worked for me with sunsets is making sure the sun is dead centre of the shot. This tends to avoid the sunspots, although the layout of your photo sometimes isn't the best. You can always trim it to suit later!
Wello
Wello
- wello
- Athrotaxis cupressoides
- Posts: 147
- Joined: Sat 05 Apr, 2008 10:43 am
-
Kainas - Athrotaxis cupressoides
- Posts: 410
- Joined: Mon 24 Nov, 2008 3:31 pm
- Location: The Hunter (Cessnock), Australia
- Region: New South Wales
Re: Bunya Mountains (aka testing the new camera
![]() by cvn76hk » Fri 27 Mar, 2009 9:35 am
by cvn76hk » Fri 27 Mar, 2009 9:35 am
Absolutely love the second last shot, amazing light and very good composition.
About the sun, I don't really avoid the flares since it will happen anytime anywhere, so I just compose it the way I want and if possible try to incoporate the flare as part of my photo. Imperfections of lenses can always be turned into a plus for your photos like fisheye lenses.
Cheers
About the sun, I don't really avoid the flares since it will happen anytime anywhere, so I just compose it the way I want and if possible try to incoporate the flare as part of my photo. Imperfections of lenses can always be turned into a plus for your photos like fisheye lenses.
Cheers
- cvn76hk
- Nothofagus cunninghamii

- Posts: 5
- Joined: Tue 25 Nov, 2008 11:44 am
Re: Bunya Mountains (aka testing the new camera
![]() by tasadam » Fri 27 Mar, 2009 12:55 pm
by tasadam » Fri 27 Mar, 2009 12:55 pm
Kainas wrote:Had some fun with some sunset shots. Any tricks to avoiding the sun spots?
Either very expensive lenses (to limit the sunspots, but no guarantee of avoiding), or don't shoot into the sun, or Photoshop...
- Edited sunspot out
-
tasadam - Magnus administratio

- Posts: 5900
- Joined: Tue 10 Apr, 2007 6:58 pm
- Location: Near Devonport, Tasmania
- ASSOCIATED ORGANISATIONS: TasmaniART, Smitten Merino, Macpac
- Region: Tasmania
- Gender: Male
Re: Bunya Mountains (aka testing the new camera
![]() by Kainas » Fri 27 Mar, 2009 9:30 pm
by Kainas » Fri 27 Mar, 2009 9:30 pm
Thanks for the sun spots thoughts, makes me feel a bit better about the shots. (yeh, I jumped into Photoshop to get rid of the sunspot in another of the photos  ).
).
-
Kainas - Athrotaxis cupressoides
- Posts: 410
- Joined: Mon 24 Nov, 2008 3:31 pm
- Location: The Hunter (Cessnock), Australia
- Region: New South Wales
Re: Bunya Mountains (aka testing the new camera
![]() by tasadam » Sat 28 Mar, 2009 6:51 am
by tasadam » Sat 28 Mar, 2009 6:51 am
Yeah, don't be disheartened. There's not much you can do about it.Kainas wrote:... makes me feel a bit better about the shots.
The shot of the grasses looks so good because of the narrow depth of field (wider aperture - f8 in this shot but could have got narrower DOF wider still), emphasised by a bit of zoom (only 55mm, but not wide angle per se), and a good bit of distance to the darker background.
With digital, you can paly with all these things when you take photos like that so you can see what you like, what works etc.
Try a narrow DOF on subjects like the Kookaburra so that it stands out better. Zoom will emphasize a narrow DOF as well. The other benefit a wide aperture gives you is a faster shutter (or the scope to move the ISO lower). You could also try centering the bird in the photo - here you have aimed for its head/beak, which is also fine. You lose the tail a bit in the dark bushes behind it - DOF might help make it stand out better, also you could move a little to the left to remove the darkest bits from behind the subject when they are at similar tones. Way too much to think about at first, but it takes practice. The more you study your own results and think about what you could have done differently (I say differently, not necessarily better), the more you will learn what to do in the field to achieve certain results.
The people shot (blurry) was never going to work - you used F4 (assuming as wide as that lens goes?), and ISO 800, yet it still required 1/4 second to catch the required amount of light. Basically, there just wasn't enough light for that photo.
What else could you do there? Bump the ISO as high as it goes, open the lens as wide as it goes, use wide angle to catch more light (try looking at the settings for the same photo in shadows somewhere at wide angle then at zoom and see the required shutter speed for each image).
It's usually better to get a grainy image at high ISO than to miss out by having a blurry result.
Another thing you can do if you really want to catch the image is to use manual exposure, force it to about 1/60 second, try 1/30 second as well), then bump the levels on the under-exposed image on the computer. The result won't be great, but it should be better than blurry.
I had a close look at the bbq shot. It's not sharp and I am trying to work out why.
F5 is partly to blame, though if the focal point was in the right place and the camera steady, it could just be enough. The leading edge of the hat on the left seems to be the sharpest point - perhaps try to lock the focus a third of the way into the area you want to be sharp - perhaps the hand of the young lady. Most important too to hold the camera steady as the shutter is pressed.
Also, think about what you want in the image - when you look through the shutter, pretend you are looking at the image as it is printed or displayed on a computer. Adjust things like -
How high you are (sometimes you need to squat or stand on something)
How much you want in the image - use more zoom, or aim lower to get more of the subject in the photo - in this case it's the trees to the top and left
How much you want in the background - move closer and go more wide angle, or move further back and go more zoom.
Have I got things square and level / straight horizon?
Is there something to prop the camera against to help keep it steady - tree, clothes line, tripod??
Squeeze that shutter gently until the click is done - so often I see the button pressed firmly at "just the right time". It's so important to have the camera as still as possible for the duration the shutter is open.
Here's an example of your photo with a simple crop, and a quick play with brightness, contrast, and mid-tones in Microsoft Photo Editor -
- Cropped and tweaked
It's not that this is any better, just different - demonstrating what can be achieved.
Have fun playing - the more practice you get and the more you study your results looking for ways to change shots, the better you will get in the field, knowing more about what you can do.
Hope that all helps.
-
tasadam - Magnus administratio
- Posts: 5900
- Joined: Tue 10 Apr, 2007 6:58 pm
- Location: Near Devonport, Tasmania
- ASSOCIATED ORGANISATIONS: TasmaniART, Smitten Merino, Macpac
- Region: Tasmania
- Gender: Male
Re: Bunya Mountains (aka testing the new camera
![]() by iandsmith » Sat 28 Mar, 2009 7:25 am
by iandsmith » Sat 28 Mar, 2009 7:25 am
If I could be so bold, you need to think about composition a little more.
With the grass shot, there is no feature in it so there's nothing that the eye is drawn to.
With the kookaburra, if it was possible to zoom in closer you might have lessened the bright contrasts.
Just some thoughts.
Cheers.
With the grass shot, there is no feature in it so there's nothing that the eye is drawn to.
With the kookaburra, if it was possible to zoom in closer you might have lessened the bright contrasts.
Just some thoughts.
Cheers.
-
iandsmith - Athrotaxis cupressoides
- Posts: 364
- Joined: Thu 22 Jan, 2009 3:27 pm
- Location: Newcastle
Re: Bunya Mountains (aka testing the new camera
![]() by Kainas » Sat 18 Apr, 2009 4:18 pm
by Kainas » Sat 18 Apr, 2009 4:18 pm
iandsmith wrote:If I could be so bold
Absolutely. I posted these photos for no other reason. (First try with my first *real* camera).
iandsmith wrote:With the grass shot, there is no feature in it so there's nothing that the eye is drawn to.
I really like this shot but felt something was missing and didn't know what..I understand now.
Thank you both for the input. You have given me heaps to think about. Looking for another chance to get out an take some more photos now. The last two weekends have been rained out!
-
Kainas - Athrotaxis cupressoides
- Posts: 410
- Joined: Mon 24 Nov, 2008 3:31 pm
- Location: The Hunter (Cessnock), Australia
- Region: New South Wales
Re: Bunya Mountains (aka testing the new camera
![]() by the_camera_poser » Sat 18 Apr, 2009 8:59 pm
by the_camera_poser » Sat 18 Apr, 2009 8:59 pm
WOW! What a huge improvement over the point-and shoot shots. I love that kookaburra shot, and the grass silhouette shot is great too. I'd say the one of the people walking needed ISO 800, the widest-open Av setting you could get, or even a tripod.
The sun spot is flare- one of the bains of digital photography. Very expensive lenses help a bit, but not too much. Sometimes you can get rid of flare with photoshop.
The sun spot is flare- one of the bains of digital photography. Very expensive lenses help a bit, but not too much. Sometimes you can get rid of flare with photoshop.
- the_camera_poser
12 posts
• Page 1 of 1
Who is online
Users browsing this forum: No registered users and 1 guest