Topographic maps enable the user to take measurements of distance and elevation. The accuracy of these measurements can be in the order of metres depending on the scale of the map.
The following measurements can be taken from a standard topographic map:
- Distance
- Bearing
- Elevation change.
Calculating the distance between two points on a map is done by measuring the distance with a ruler in centimetres, then converting it to metres or kilometres.
For a straight-line distance between two objects, use a ruler to measure the distance between the points. If the distance is curved, use string along the curve, then lay it on a ruler to measure the length of the string.
Find the scale bar on the map. It might be written as a fraction (1/25,000 or 1:25,000) or a bar scale. Both provide a conversion factor that must be applied to calculate the real distance. A 1:25,000 scale map says that for every 1 cm on the map it represents 25,000 cm on the ground. So if the distance measured on the map is 25 cm, the distance on the ground is 25×25,000=625,000cm or 6.25km.
The precise formula is:
(Map distance (in centimetres) x denominator of scale)/100,000 = Real distance (in kilometres)
Some compasses include a converted scale on one side of them where the measurement for 1:25,000 maps or 1:50,000 maps is in kilometres already. Having a converted scale on hand can be useful for getting rough estimates of distance quickly. Alternatively, on 1:25,000 maps, each grid represents a km, so it’s possible to eyeball the map to get a rough distance estimate without using a ruler. Using the compass or eyeballing the map is most practical out on a bushwalk.

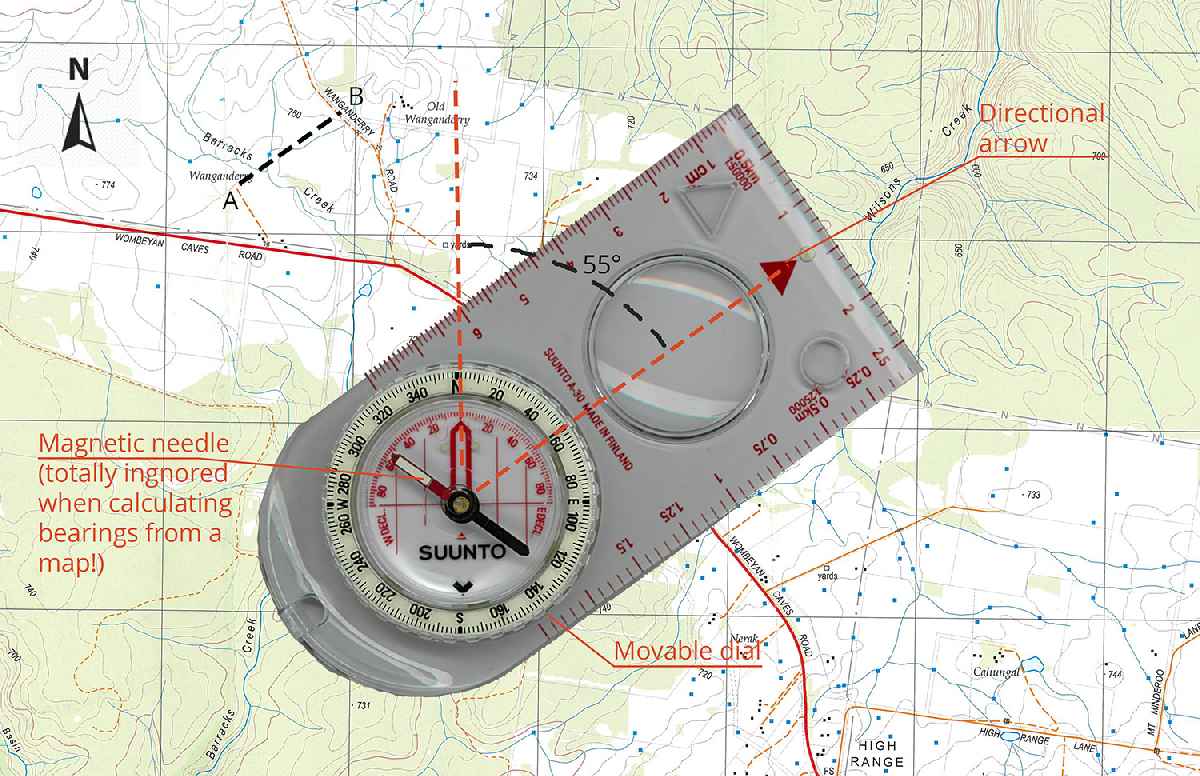
A bearing is a number in degrees that represents the direction of one point relative to another. It’s helpful for navigating between two points or triangulating a location. On topographic maps, the bearing is relative to grid north.
For calculating the bearing of point B relative to point A, follow these steps (note that the map does not need to be oriented):
1. Draw a line on the map between points A and B.
2. Line up compass with the directional arrow pointing from A towards B. Make sure that the direction is correct, otherwise the bearing will be 180° out.
3. Rotate the movable dial so that large red arrow on the dial is parallel to the North/South grid lines on the map, and the arrow is facing north. Ignore the magnetic needle in this step. Make sure that the dial is aligned with grid north, not grid south (easy to do if the map is upside down), and that the directional arrow hasn’t slipped out of place during this step.
4. Read the dial to give a number between 0° and 360°, clockwise from north.
Note: The bearing taken from a map is the grid angle, but bushwalkers must use the magnetic angle when navigating in the field. Hence a grid bearing must be converted to a magnetic bearing before using it to navigate.
Changes in elevation can be calculated using contour lines. Check the image for an example.
The lower index contour line is numbered 200, which means any point on that line is at an elevation of 200 meters above mean sea level. The upper index contour line is numbered 300, or 300 meters. A bushwalker traveling from X(a) to X(b) will go up in elevation. The exact amount of change can also be calculated: Point X(a) is located on the second intermediate contour line above the 200-meter index contour line. The contour interval is 20 meters (there are four intermediate contour lines of 20 m between the 200 m and 300 m contour line) and hence the bushwalker will go through an increase in elevation of 40 m (240 m to 280 m).
To determine the elevation to a hilltop, point (c), add one-half the contour interval to the height of the last contour line. In this example, the last contour line before the hilltop is an index contour line numbered 300. Add one-half the contour interval, 10 meters, to the index contour line. The elevation of the hill would be 310 meters.
