This walk follows a section of the Great North Walk (GNW), starting from the Wondabyne train station and winding north, into the Brisbane Waters National Park. The walk climbs to the top of Scopas Peak, and down to the Phill Haughton bridge. The campsite for the night is beside Mooney Mooney Creek. On day two, the walk heads through the bush to the Somersby general store, where you can find a hot meal and wait for your lift home.
GPS at the start -33.492083, 151.25696GPS at the end -33.358081, 151.29029Getting thereTrain: When you catch the train to Wondabyne, let the guard know you want to get off at Wondabyne Station, otherwise the train will not stop. Travel in the last carriage and exit at the last door as the platform is very short. To catch the train from Wondabyne, wave to the driver.
Getting homeBus: A bus service runs along Wisemans Ferry Road passing Somersby store. The service runs between Gosford and Spencer only a few times a day. Please check timetable for more info or Phone Busway on (02) 4368 2277. The bus only picks passengers up to head to Somersby on the afternoon runs (get details).
Car: There is free parking available (get details) at the end of the walk. Note there is no car access at the start, train only.
26.2 kilometres one way

2 days
1160 metres climb
Hard(Very steep sections)


View of Mooney Mooney Creek

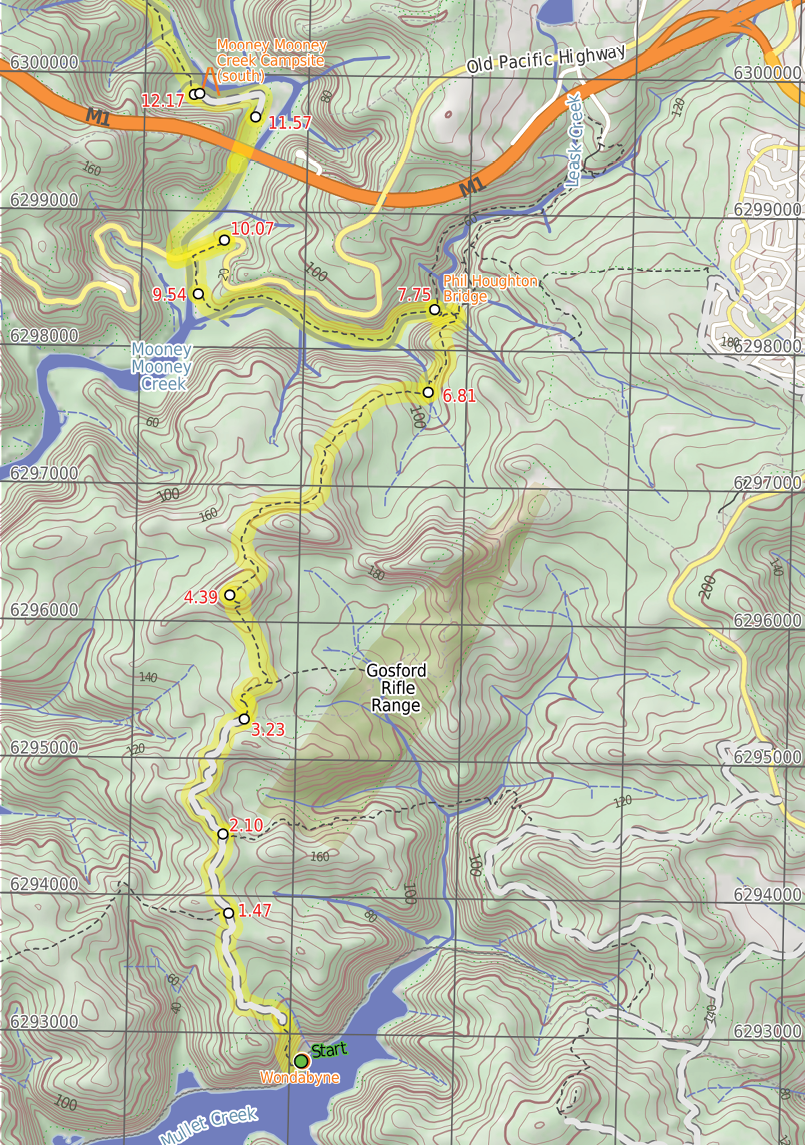
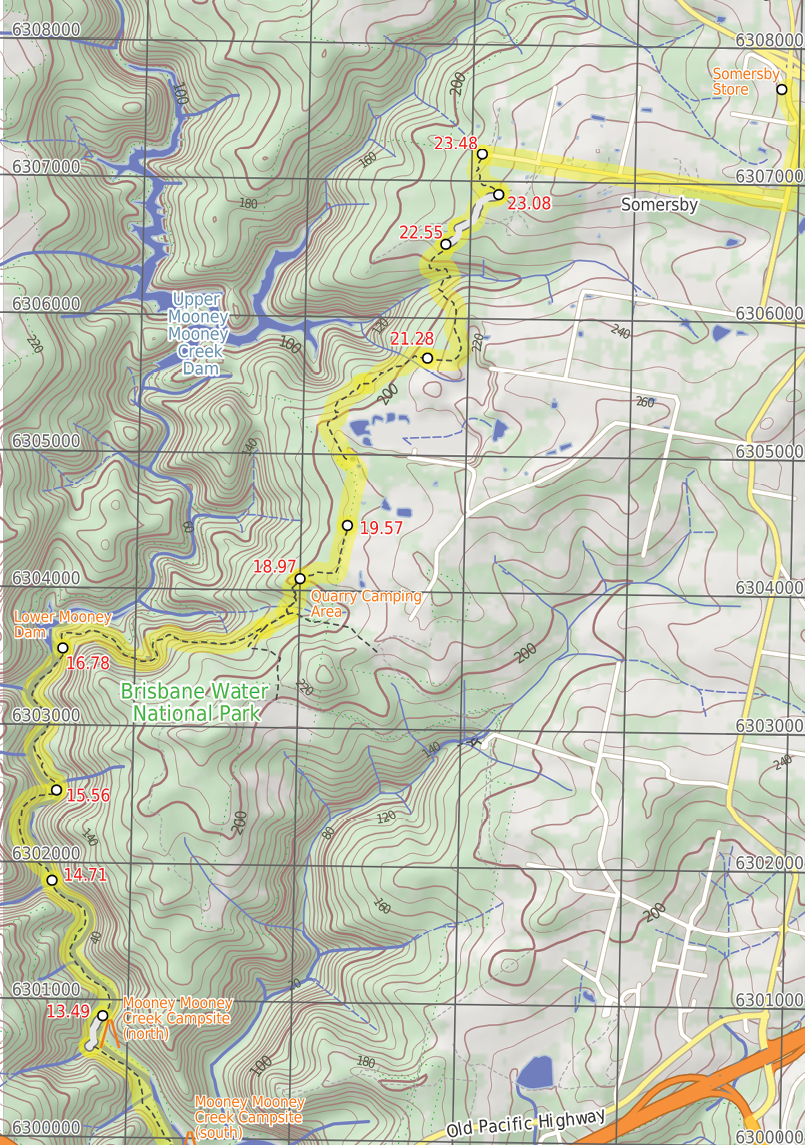
Wondabyne Station to Somersby Store
Matt McClelland
12 | BWA October 2016
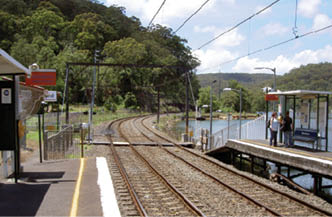
Wondabyne Station

Wondabyne (0 km) Wondabyne is situated in Brisbane Waters National Park on the banks of Mullet River, which feeds into the Hawkesbury River north of Brooklyn. The area is defined by the national park's flora and fauna, the quarry, railway station and a few houses sitting above the water around the river. The quarry produced sandstone building materials, used in the construction of the National War Memorial in Canberra. More recently, in 2000, the quarry was re-opened for restoration of St Marys Cathedral spire in Sydney. Wondabyne Station, named after the nearby Mt Wondabyne, was built in 1889 and exclusively used for the quarry - it was then known as Mullet Creek Station. The station is one of the smallest on the line and one of very few railway stations in a NSW national park.
Wondabyne Station (0 km) From the north-bound platform of Wondabyne Station, follow the The Great North Walk sign off the southern the end of the platform, keeping the train lines and water to your left. Go past a strangler fig and a large boulder then veer right and head up a timber staircase with a metal landing at the top. Walk steeply uphill, up a series of timber and rock steps for just over 200 metres to pass a filtered view of the cranes (right), down at the old Gosford Quarry. Here continue a bit more steeply uphill for another 150 metres, up a series of rock steps, and then, soon after walking up the carved steps in a cleft in a rock, the track flattens out and you will come to a clearing at the end of a management trail, marked with a Brisbane Water National Park sign. Continue straight from the clearing, following the wide
management trail uphill past the Brisbane Water National Park sign. Head up quite steeply for about 250 metres, and follow the trail as it bends right then leads gently uphill for about 600 metres. Head up a short but quite steep hill, then veer left and, about 150 metres later, come to an intersection with the Pindar Cave track (that leads over a rock platform, on your left), marked with a GNW arrow post (on your right).
Eastern end of the Pindar Cave Track (1.5 km) Continue straight following the GNW arrow post north, gently uphill along the wide trail. Follow the trail as it gently undulates along the top of the ridge for about 600 metres to an intersection with the Great North Walk track (on your right), marked with a Wondabyne Station sign pointing back down the hill.
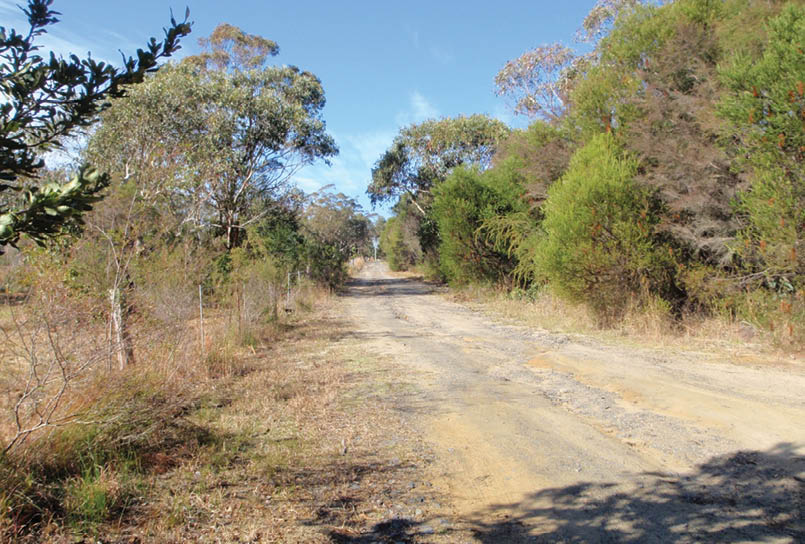
Intersection of GNW and Wondabyne Trail (2.1 km) Continue straight following the Girrakool sign uphill along the wide trail. After about 50 metres, head up onto a large rock platform. From the top of this platform, there are some distant views over Mooney Mooney Creek. Continue on the platform, following the scrape marks on the rock, tending right, to soon find the wide trail again. Follow the trail as it undulates (moderately steeply in a few places) along the ridge line for about 900 metres to an intersection marked with a Girrakool sign (pointing left), just before a No Entry Past This Point sign.
South end of Scopas Peak Track (3.2 km) Turn left to follow the Girrakool sign and GNW arrow post north along the clear track. After about 150 metres, you come to a green painted metal box on a post (on your right), containing a Great North Walk intentions book. Leave your comments, then continue straight from the Great North Walk intentions book, walk north, gently up along the clear track. Follow the track as it gently undulates along this ridge for about 750 metres, leading across a long sandy saddle to the base of Scopas Peak. Here climb steeply for about 230 metres, stopping occasionally to enjoy the view, up the series of rocks with cut steps and past a few rock walls. Near the top of this climb, the track bends left to head up to a view point just to the west of Scopas Peak.
BWA October 2016 | 13
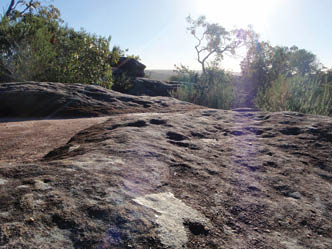
Rock flats
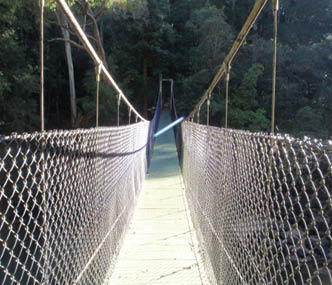
Phil Houghton Bridge

Scopas Peak (4.4 km) Veer right from the view point just west of Scopas Peak, walk north-east and gently downhill, initially keeping the distant views to your left. Head down the notably steeper track for about 300 metres to then cross over a long rock platform, with a series of GNW arrow posts guiding the way. After this rock platform, walk for another 250 metres, crossing a couple of small rock platforms before leading along a heathy track. About 400 metres along, pass another view to Mooney Mooney Bridge, then come to the edge of another large rock platform. A series of GNW arrow posts lead across this rock platform, generally heading away from Scopas Peak for about 400 metres, where the arrows lead off the rock platform and back onto a heathy track. Follow the rocky track as it continues down along the ridge for just shy of 300 metres to the edge of another smaller rock platform with more with distant views. From here, head downhill for about 600 metres, passing a couple of rocky outcrops and becoming progressively steeper until coming to the edge of an intermittent creek, which flows over the solid sandstone platform, at the bottom of the valley.
Tributary crossing (6.8 km) Continue straight from the western bank, cross the intermittent creek which flows over the solid sandstone platform, to follow the track uphill. Walk gently uphill but soon head steeply up for about 130 metres, where the track mostly flattens out to pass a sandstone overhang (on your right). Soon
after this overhang, walk over a small gully then along the side of a longer rock wall with another tall sandstone overhang. Continue gently downhill for another 300 metres, as the track becomes a little steeper along the way, until just past a set of rock steps. Here head steeply down the side of the hill for about 130 metres, first passing through a cleft in the rock then past a few rock walls. Just after a few switchbacks, walk into a narrow gully, past a small Patonga sign, then come to a three-way intersection beside an intermittent creek, marked with a large The Great North Walk sign with a Patonga Ferry arrow pointing back up the hill. Continue straight following the Piles Creek sign down the track (keeping the valley to the right). Follow the rocky track steeply downhill for about 170 metres to Piles Creek. Just past the old bridge, climb up the stairs to cross the Phil Houghton suspension footbridge, enjoying the views of the tidal Piles Creek. On the other side, climb down the stairs to an intersection beside a large clearing (and campsite, on your left).
Phil Houghton Bridge The Phil Houghton Bridge is a metal suspension bridge that crosses Piles Creek. It is part of the Great North Walk and replaces an older bridge, with part still visible upstream. The bridge can hold up to eight people and feels very stable. There are great views both up and downstream half way across this bridge. There is a clearing on the northern side that people have used for camping.
BWA October 2016 | 15
Old Pacific Highway - Mooney Mooney Bridge

Phil Houghton Bridge (7.8 km) Turn left from the intersection on the northern end of the Phil Houghton Bridge, following the Mooney Creek arrow through the large clearing and campsite, keeping Piles Creek to your left. Head under a large dead tree then wind past some cliffs and among large boulders for about one kilometre then cross a short timber bridge with handrails. Just past this bridge, walk over a short flat timber bridge, then about just shy of 150 metres later, head along a section of timber boardwalk. From this tall eucalypt forest, follow the track as it contours around the side of the hill for about 500 metres, alongside Piles Creek, then starts to climb passing among the grass trees before heading down a handful of timber steps and coming to a three-way intersection marked with a Brisbane Waters National Park sign, just before Mooney Mooney Creek.
Brisbane Water NP sign (9.5 km) Turn right following the GNW arrow post directly away from the face of the Brisbane Waters National Park sign along the clear track, keeping Mooney Mooney Creek to your left. After about 100 metres, cross a green timber footbridge, then about 200 metres later come to a small clearing and intersection just before the road bridge. Here turn right, following the old management trail uphill through the tall forest for about 200 metres then heading around a locked gate. Just past the gate, turn left and head up the short steep bank to a T intersection with the old Pacific Highway, at a large gravel car park marked with Mooney Mooney Creek Trackhead (just east of the Mooney Mooney Creek bridge).
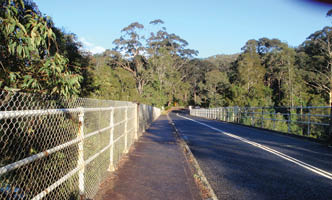
Mooney Mooney Creek Trackhead (10.1 km) Turn left following the Newcastle sign along the narrowing gravel verge, keeping the Old Pacific Highway just to your right. After about 200 metres cross the concrete road bridge over Mooney Mooney Creek, enjoying the view of the wide creek below. Once on the other side, walk past a detailed Risk Warning sign suggesting you be sensible as you cross the bridge (hope it is not too late) to then come to an intersection with Karool Road, just on the other side of the highway (on your right). Turn right following the gravel Karool Road gently downhill, keeping Mooney Mooney Creek to your right. This road leads past a few homes for about 600 metres to then pass a notable houseboat house. About 250 metres past this house, come to a Y intersection, marked with a The Great North Walk sign, just before the tall concrete Mooney Mooney Bridge. Veer left from the Y intersection, following the The Great North Walk sign along the upper dirt road to pass under the Mooney Mooney (F3 freeway) Bridge. Just over 250 metres after passing under the tall bridge, head up to a large turning area just before the locked gate, marked with a Brisbane Water National Park sign.
National Park Gate (11.6 km) Continue straight from the end off the dirt road (that branches off Karool Road, just north of the Mooney Mooney Bridge), walk uphill along the trail and around the locked gate next to the timber Brisbane Water National Park sign. Follow the trail as it leads uphill for about 200 metres to where the trail bends left to pass over the crest of the hill (passing a faint track on your left). Here the trail leads down the other side, still keeping Mooney Mooney Creek to your right for another 400 metres to an intersection marked with a GNW arrow post, beside a large grassy clearing and campsite (on your right).
Mooney Mooney Creek Campsite (south) This clearing is beside the wide Mooney Mooney Creek and provides a large flat area to pitch a few tents. There are some high-tension power lines nearby and you can hear the hum of the F3 from here, so it is not the most remote campsite. There are no facilities
BWA October 2016 | 17


or water (the creek is salty). All that said it is still a pleasant spot beside the wide creek to rest for a while or for the night.
Mooney Mooney Creek Campsite (south) (12.2 km) Veer right from the intersection just above the campsite, following the GNW arrow post down along the track, keeping the clearing and campsite to the right. Soon you walk over a small flat timber bridge then over the next 60 metres, head under the high-tension power lines (past the caution sign) and then along a short section of timber boardwalk. About 20 metres later, veer right at a Y intersection, then continue along the mostly flat track beside Mooney Mooney Creek for about 300 metres, to cross a small rocky tidal creek. Continue through the tall forest beside Mooney Mooney Creek for about 600 metres, passing a couple of she-oak stands before the track then bends left and comes to an indistinct intersection beside a timber and metal footbridge. Continue straight cross
the timber and metal footbridge over a tidal, unnamed creek to then turn right and follow the track which soon bends left. Keeping Mooney Mooney Creek to the right, pass a small cliff then follow the mostly flat track through the tall forest for about 170 metres to a large clearing with tall blue gums and a metal fireplace (on your left), signposted as a Camping area.
Mooney Mooney Creek Campsite (north) (13.5 km) This signposted campsite sits among the tall eucalypt and bracken fern forest beside the Mooney Mooney Creek. This is a very pleasant flat clearing to spend a night, there is a small metal fireplace hotplate and room for a small number of tents. There is no drinking water or other facilities at this campsite (Mooney Mooney Creek is salty at this point, treatable water may be found about two kilometres north).
End of day 1 This is the planned overnight stay for the end of day 1, happy camping.
Mooney Mooney Dam
18 | BWA October 2016


Mooney Mooney Creek Campsite (north) (13.5 km) Continue straight ahead from the campsite, following the clear track north, keeping the wide Mooney Mooney Creek to your right. The clear, wide and mostly flat track leads alongside the creek for about 1.2 kilometres to the south bank of Ausburn Creek (about 130 metres past a rock wall, on your left), a few metres above its confluence with Mooney Mooney Creek.
Ausburn Creek crossing (14.7 km) Continue along the south bank of Ausburn Creek, crossing the narrow rock platform and creek, then following the track fairly steeply uphill for about 200 metres. At the top of this climb, gently undulate alongside Mooney Mooney Creek for about 700 metres before heading down to find a large rock platform on the western bank of Mooney Mooney Creek. This large rock platform is a natural ford of the perennial Mooney Mooney Creek and is home to a scattering of small and large waterholes.
Mooney Mooney Creek crossing (15.6 km) From the bank of Mooney Mooney Creek, cross the wide rock platform and creek to find the track on the other side. This creek may become impassable after heavy or prolonged rain. Here turn left and follow the rocky track that leads gently up alongside the creek through the pleasant forest. After a little over a kilometre, you come into view of the tailwater of the dam and then past a fenced cutting (on your right), the site of an old pump house. About 60 metres past this fenced area, head up along the now widening track to find the edge of the fenced lower Mooney Mooney Dam wall.
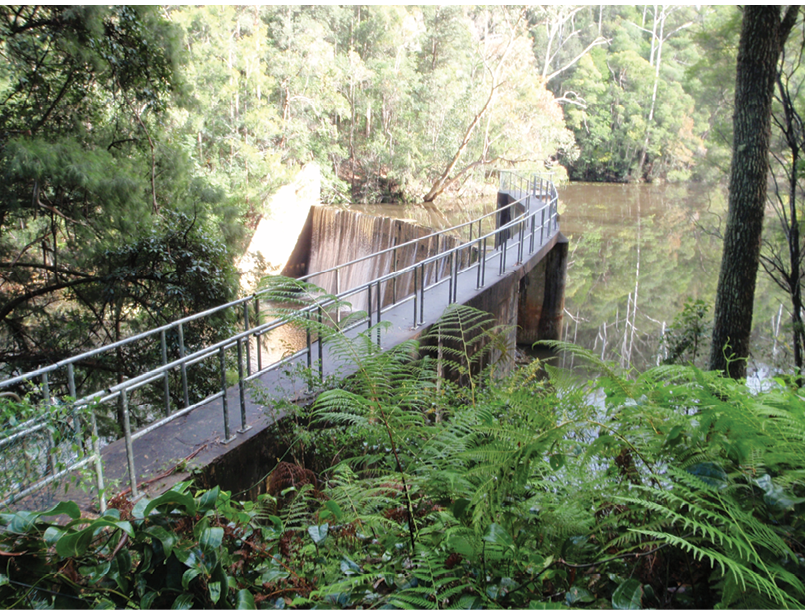
Lower Mooney Dam Lower Mooney Dam is located on the Mooney Mooney Creek, about 21 kilometres upstream from the Hawkesbury River. In March 1938 the Gosford Mayor turned the tap to add the water from this dam into the small town water supply of the time. It is a concrete arch dam, with a capacity of 1000 megalitres, and was superseded by the more than 4 times larger Upper Mooney Dam in 1982. There is a set of timber steps and a faint track that leads down to the
waters edge on the uphill side of the dam wall, the dam wall is fenced and is clearly out of bounds. A sign reminds visitors that swimming is not allowed.
Lower Mooney Mooney Dam (16.8 km) Continue straight from the lower Mooney Mooney Dam, walk uphill along the old trail, initially keeping the water on your left. Head up, enjoying the occasional glimpse of water (on your left) for about 400 metres to pass a washed-out section of the old trail. From here, continue up along the trail for about 1.3 kilometres, getting steeper as it climbs, and come to a three-way intersection marked with a Mooney Creek sign pointing back downhill. Turn left following the Reserve Road sign uphill along the old trail, initially keeping the valley to your left. After about 180 metres, come to a faint intersection marked with a The Great North Walk sign. Turn left following the The Great North Walk sign downhill along the track for about 50 metres, to cross a small pleasant gully with an ephemeral creek. The track starts to wind moderately steeply uphill then, soon after flattening out it comes to a signposted Camping Area with a metal fireplace.
Quarry Camping Area This is a small signposted campsite set among heath, grass tress, scribbly gums and aother eucalpyts. The clearing is flat and sandy and provides room to set up a few tents with and a small metal fireplace with hotplate. There is no water or other facilites here.
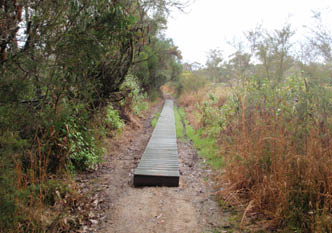
Duckboard near Quarry
BWA October 2016 | 19
Quarry Camping Area (19 km) Continue straight from in front of the camping area, walk gently uphill along the sandy track, initially keeping the camping area to your right. After about 220 metres of walking through this scribbly gum forest and passing a small informal campsite on the way, you come to the quarry boundary fence and turn left. Follow the fence for about 70 metres, then head to a section of timber boardwalk with a view (on the right) over parts of the quarry. Continue along the fence for about 250 metres, crossing a small flat timber bridge to come an intersection with a dirt road (just past the locked gate).
Quarry gate (19.6 km) Veer left following the GNW arrow marker gently downhill along the dirt road. Follow the road for about 400 metres to a large clearing with two large water reservoirs tanks. Continue past the two reservoirs (and past the treatment plant building, on your left) to a The Great North Walk sign just in front of a small brick building. Continue straight following the The Great North Walk sign gently downhill along the gravel trail (away from the water tanks) for a few metres
before turning right onto a track, following a GNW arrow post. Walk through the banksia and she-oak forest for just over 100 metres to pass a The Great North Walk sign and then cross Reservoir Road. On the other side of the road, continue gently down through the she-oak (Casuarina glauca) forest for about 150 metres before crossing a metal footbridge. On the other side of the bridge, turn left and follow the track as it winds down through the heathy bushland, alive with wildflowers in spring, for about 400 metres and cross a small ephemeral creek. The track then leads under high-tension power lines and then bends right and leads gently up for another 20 metres, coming to an intersection with a power line management trail. Veer right following the management trail uphill, keeping the power lines just to your right. After about 40 metres, follow the GNW arrow post left (ignoring the Private Property trail ahead) as the track winds gently uphill for about 250 metres before veering left, ignoring another Private Property track (on your right). Walk along the mostly flat track that leads along the side of the hill for about 100 metres before passing under another set of power lines and leading right, steeply up
Robinson Road
20 | BWA October 2016
the short rocky hill. At the top of this hill, walk to the end of a trail, but immediately veer right to follow a track along a fence for about 60 metres before rejoining the same power line management trail.
South end of Robinson Creek Track (21.3 km) Veer right following the GNW arrow post uphill along the wide management trail, following the power lines for about 100 metres before veering left to follow another GNW arrow post along a narrow track.
Follow the track as it leads into the bush among gymea lilies (Doryanthes excelsa) and eucalypts for almost 300 metres, crossing a couple of short flat timber bridges to then head along a few sections of timber board walk through a weedy section of bush. Continue gently downhill for another 150 metres to cross over a trail. Follow the GNW arrow post more steeply down for about 250 metres, passing through another large grove of gymea lilies, a small cave (on your left). Continue down the timber then stone steps to head into the dense moist forest and across a flat timber bridge, coming into view of the creek. Here veer right and head beside the creek for a short time before bending left, following the GNW arrow post across the creek flowing over the mossy rock bed. Just downstream is a small pool and cascade. The track starts to climb up the other side of the valley, soon crossing a small flat timber bridge. Wind steeply out of the ferns and densely forested valley, up timber and stone steps for about 130 metres where another GNW arrow post marks the end of this section of steep climbing. Head gently up among some tall eucalypts and past a large grove of gymea lily for about 230 metres to a T intersection with a wide management trail.
North end of Robinson Creek Track (22.5 km) Veer right following the GNW arrow post uphill along the wide sandy trail for about 40 metres to pass a faint trail (on your right). Then about 120 metres further up the main trail, comes a T intersection marked with a couple more GNW arrow posts. Turn right following the GNW arrow post gently uphill along the sandy trail. The trail soon leaves the wooded forest and after about 120 metres, veers left at an intersection in a clearing. After another 120 metres, head past
a large grassy clearing (on your right) with some tall pine trees. Countinue along the sandy trail for another 150 metres, past a few scribbly gums, and come to a Y intersection marked with a The Great North Walk sign (pointing left).
Intersection of Great North Walk and Private Property (23.1 km) Veer left following the The Great North Walk sign along the track, initially keeping the sandy trail to the right for a short distance. Soon bend left, then wind over a small rise through the scribbly gum forest for about 400 metres before heading over a short section of green boardwalk. A short distance later, cross a green timber footbridge and comes to an intersection at the end of the dirt Robinson Road.
End of Robinson Road (23.5 km) Turn right following the GNW arrow post uphill along the gravel Robinson Road for about 300 metres to then continue straight ahead along the sealed Silvester Road. Head along the sealed road for another 500 metres to pass an intersection with Anembo Road, then continue along Silvester Road. Over the next kilometre or so, travel among the rural properties, with distant views of the peaks in Brisbane Water NP (to your right), before turning left onto Wisemans Ferry Road at the T intersection. From here, head up along the narrow grassy verge beside the road for about 500 metres to pass the large communications tower (on your right), head over the crest of the hill then down for about 250 metres to Somersby Store (on your left).
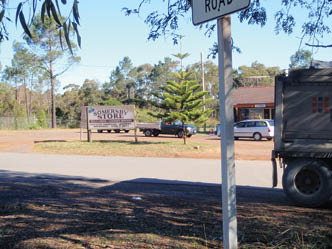
Somersby Store


BWA October 2016 | 21