
Swift Water Rescue Course
Sonya Muhlsimmer


In April 2021 I had the opportunity to do a three day Swift Water Awareness and Rescue Course for canyoners in Tasmania with Cradle Mountains Canyon Tours (CMC).
Day 2 - Learning rescue techniques when stuck in a whirlpool All uncredited pictures by Sonya Muhlsimmer
36 | BWA June 2021

In early 2021 several people drowned in canyons in the Blue Mountains, NSW. These drownings prompted Anthony O’Hern from CMC to host a course in swift water canyon rescue techniques - he thought there was a need for more awareness and training when dealing with water hazards in canyons. Any training session is great to undertake to learn, sharpen and refresh techniques, and the canyons and rivers in Cradle Mountain are the perfect venue to do such training. This was the first course of its kind in Cradle Mountain and I guess you could say, our group of seven were the guinea pigs. And yes, we all survived.
The force of the water can be quite confronting; it really makes you appreciate and respect the danger and hazards of any sport undertaken in water. How many bushwalkers drown in river crossings, swimmers at beaches? How many canyoners get stuck? A little knowledge of how to get yourself out and most importantly how to stay calm when a situation could be life saving. In May, Backpacker reported that Max LeNail, 21, drowned while navigating a section of trail that crosses the San Diego River in California’s Mission Trails Regional Park. Ask yourself, could you identify water hazards or even get out of a tricky situation or help
someone else if they got stuck in water? And did you know it is generally not safe to enter water that is greater than knee deep when you need to cross a creek or river? I encourage you to do a course in swift water if you spend any time out in water - creek or river crossings, surfing, canoeing or kayaking. There's a prerequisite to the course in that you have had canyon experience, and rightly so.
There were so many techniques that were discussed and tried, which I will discuss briefly later. The course was certainly a challenging three days and not for the faint-hearted. The water was high, fast flowing and cold. Five days prior to the course Cradle Mountain received 20 centimetres of snow at 900 metres and around 30+ centimetres at 1200 metres. By the time I arrived the snow had melted, but the water had to go somewhere, and into the canyons and rivers it went. This made a perfect training ground to test every level of senses. With this course and the predicted weather conditions it was looking like we were going to experience features of an A7 canyon, which means extremely hard. The grading means A for aquatic and 7 for Extremely difficult and very exposed.
I really didn’t feel ready for this type of canyoning course but everything was booked, so I went anyway.
Day 1 - Walking to Dove Canyon, Cradle Mountain
“Ask yourself, could you identify water hazards ...
BWA June 2021 | 37
.jpg)

Day 1 - V formation crossing white water Anthony O'Hern
A bit of background on the canyon guidesAnthony O’Hern is the owner of CMC with over 18 years in guiding. He has a background in kayaking the world, solo trekking along the Great Wall of China and working as a rafting and canyoning guide. He knows his stuff.
Alec Wilson has been a guide with CMC for five years and his background is a climbing and canyoning guide, white water kayaker instructor. He has worked in the USA at Yosemite National Park as a wilderness emergency medicine technician, which means he is specially trained in first aid and wilderness environments to provide care in an emergency. He also knows his stuff. I couldn’t have asked for more well equipped, knowledgeable and patient guides for this course. There were a few oh crap moments, but Antho and Al were always there to lend a hand.
Course overviewDay 1 – Mersey RiverThe first day was on the Mersey River with rafts, practising a number of swift water rescue techniques and how to identify water hazards.
The first tip was how to identify an eddy, and how to swim across strong currents to break through the eddy line to calmer water on the other side of the river. An eddy is a circular current of water. The water flows back upstream against the current, generally obstructed by something and the water has a softer flow rate so it's easier to manage than the current. An eddy is a good spot for entering and exiting the water as the current is not so strong. Due to the circular motion, the eddy edges are faster than the water in the middle of the eddy.
The idea is to jump in at the top of the eddy line, the point at which the eddy meets the
38 | BWA June 2021

main current, at a 45 degree angle to cross into the eddy. Start by having your arms out in front and swim as hard and fast as you can until you get to the eddy line and you are through and into the calmer water. When swimming to the shore don’t stop until your hands touch the bottom. This is the best video I have found to explain it more.
Further down the river we were testing out how to cross a river in a group in a V-shaped wedge. As a bushwalker this was extremely valuable as I have had to cross so many dodgy rivers. I know in one river, a few people perished the year before by being swept away. The strongest person goes at the front and uses a walking pole or a paddle if you happen to have one as we did. The next two people go on either side of the first person at an angle, holding on, and if you have anyone else they can go behind the first person and in the middle of the side two. Face upstream, go slowly and shuffle your feet, always have two to three points of contact, hold on and push down. If you get swept away turn onto your back, ditch your pack ASAP if you have one, and face your feet downstream with your feet pointing up and legs bent slightly, then aim for the bank in a diagonal direction.
For backpacking, don’t forget to unclip your waist and chest straps before entering the water for easy disposal in case you do fall in and get swept away so that the pack won’t drag you down.
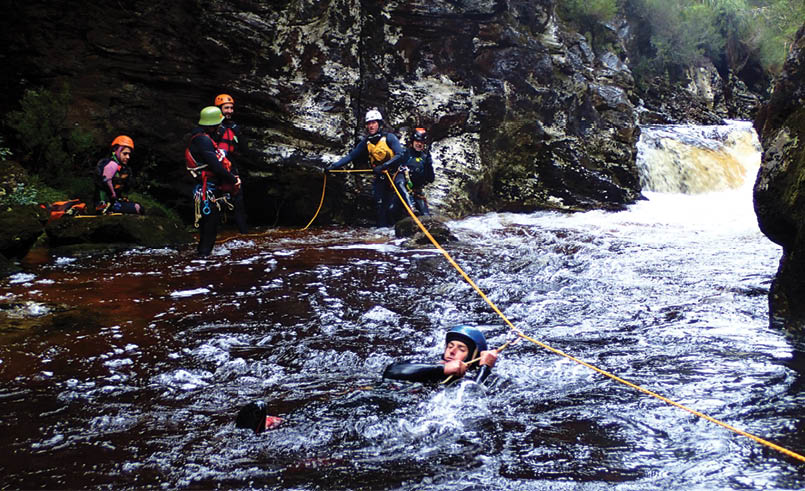
Next we crossed a river using a tensioned diagonal line. The catch to this one is send the strongest swimmer first with the rope
attached to the person, when they are on the other side they can attach it to an anchor at about 45 degrees downstream. Attach yourself to the line using a sling or safety line if you have one and go on your back with your feet facing downstream and generally the current will take you. If the current doesn’t pull you, use your hands and pull yourself down the line.
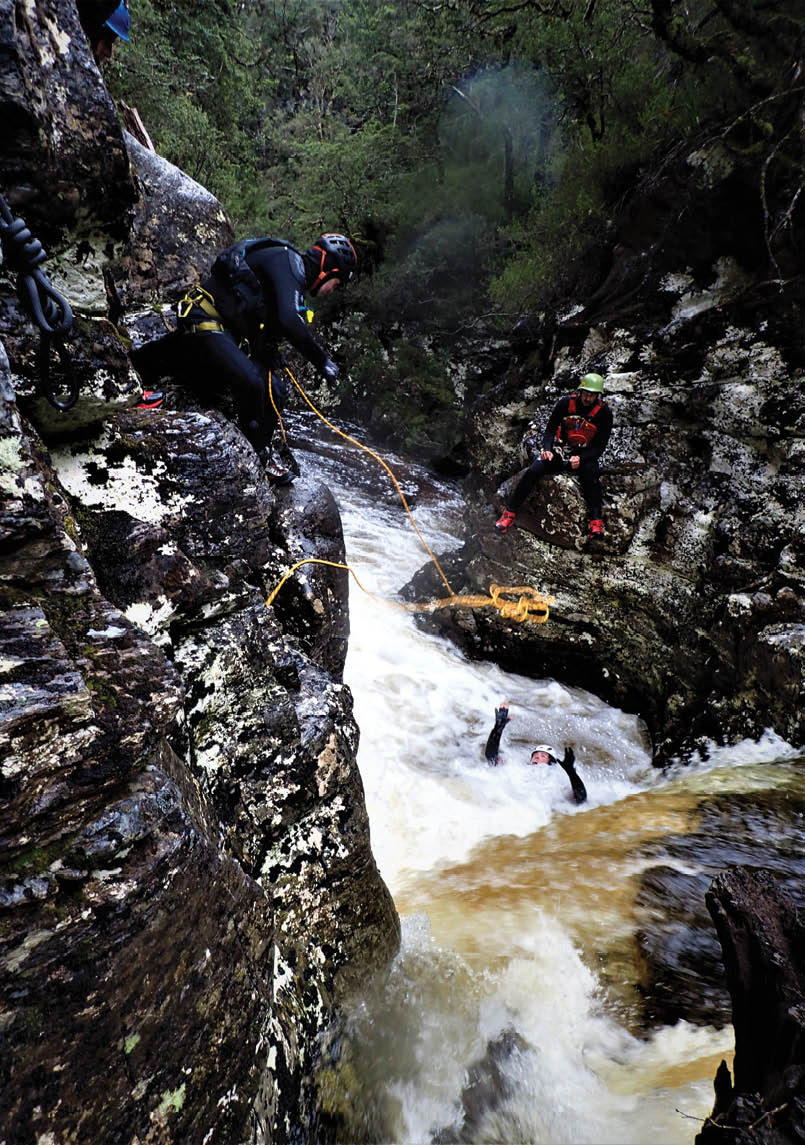
Further down the river we learned how to use throw ropes and also tested out how to save someone using a live bait rescue, explained later. Briefly, a throw rope is a bag full of a floating material rope and it is thrown generally in an overhand throw towards the victim. Start by ensuring you have a back up person behind you to help pull the victim in and then by pulling out some rope, hold the free end of the rope in one hand and the bag in the tossing hand. Throw the bag right in front of the victim. Once the victim has the rope, pull them in. See this.
A live bait rescue is used when the rescuer jumps in to save someone. The "bait" or rescuer is tied into the rope through a releasable harness or life jacket and jumps in upstream as close as possible to the person, grabbing onto the victim, getting behind them and holding onto their life jacket or shoulder. Then you can grab onto the rope behind you and in a ferry position, aid them to safety. You want to be behind the victim so if they are in a panic you can let them go not to get yourself in a pickle. There are always one or two other people at the end of the line to help pull in the rescuer and the victim. See how to perform a live bait rescue here.

Day 1 - Using a tensioned line to cross white water
BWA June 2021 | 39
We also learned how to ferry glide to cross a current. Ferry gliding is crossing the river from one eddy to another without losing distance downstream. This was done on a raft and it involves speed to stay stable, angle to cross the eddy pointing upstream and edging downstream when you approach the eddy line.
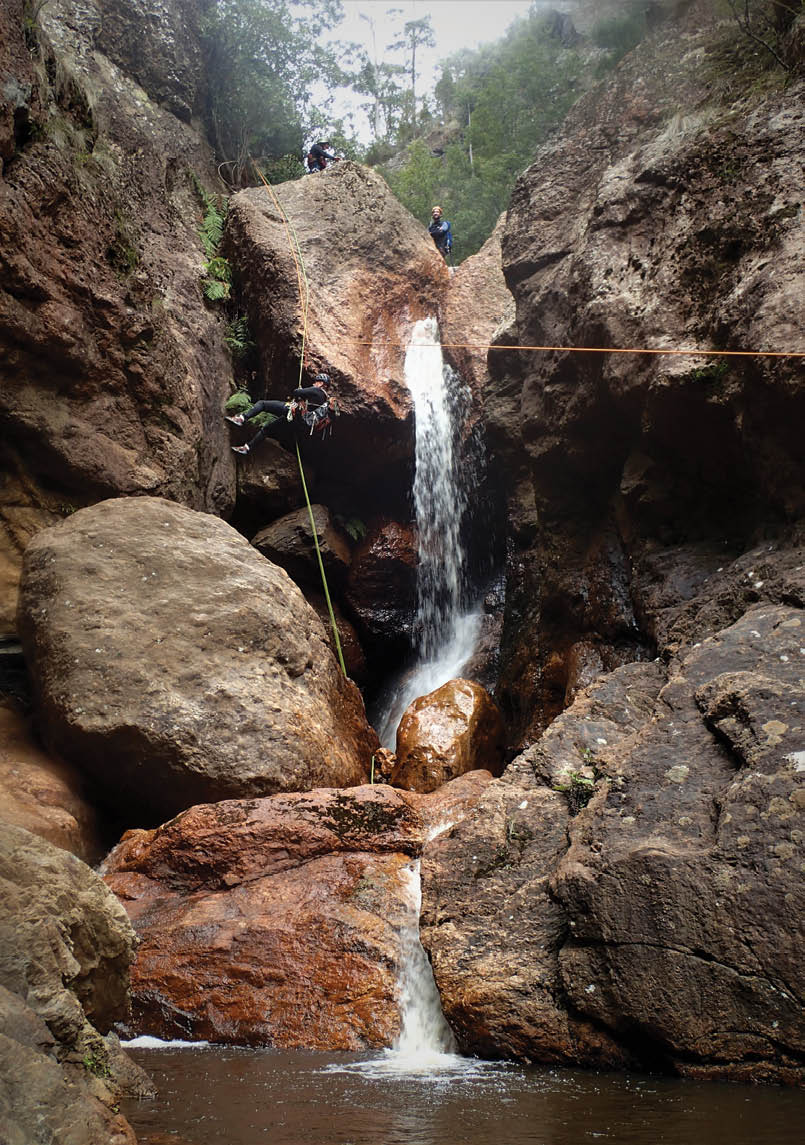
Day 2 – Dove CanyonWe spent the day in the top and lower sections of Dove Canyon. There were lots of exercises that were practised and many discussions were had along the way about escaping forms of hydraulics (stoppers and holes). The water was too high for us to go through the canyon proper - the water level marker was completely underwater - so we abseiled in and climbed out at either end.
The first exercise was in a strong retentive eddy, or in other words something like a whirlpool. Once you jumped in you would continue spinning around. We tried a few techniques in this feature such as trying to swim out and throwing a rope that we tensioned off downstream using a rope bag. The force you had to use to swim out was confronting and extremely hard. Firstly you had to aim upstream. If you were lucky, you would catch the current and then you would be swept out of the downstream side of the eddy. If not, it is back around the eddy you go. We also tried using our feet to push off against the wall to get out of the current. The tensioned rope with the rope bag was quite a success. The rescuer throws the rope bag downstream and the bag simply fills up and creates a good tension line, just by using the current of the water. The rope is thrown in at the victim and they pull themselves out along the rope. Further down this section of the canyon we also tried some more tensioned line crossings.
After lunch, we abseiled into the top of Tea Cup Falls, and I must say this section looked very intimidating. My choice was to jump 3-4 metres or climb out about 30 or more metres, so I jumped. The water was white
and frothy and very fast flowing through a narrow tunnel. In case we needed rescuing, Al wedged himself in the narrow section just past where we jumped into the frothy water; it was comforting to have him there. After this section the canyon opened up a little with a ledge you could climb out onto, but then if you missed the climb, the current would drag you over a 4-5 metre waterfall. We were warned about this and guess what? This happened to me. I missed the climb out due to some confusion, lack of communication and hesitation, and over I went. That incident really scared me but I managed to get out at the bottom and Al came down to make sure I got out, before the next waterfall and to see if I was alright. This was the correct way to go over and most people went this way. The alternative was to abseil beside the waterfall which someone in the group did. I just would have liked to go over the waterfall when I was ready and not get sucked over by the current. At the bottom of the pool we tested the methods of pushing off with your feet through strong currents.
Further down and near the end of Dove Canyon we tried using the rope bag again with a tensioned line. Al also showed us how to do a Superman dive. This dive method is really useful if you don’t know how deep the water is, or if there are any obstructions under the water that you can’t see due to fast flowing water and to get out of a retentive eddy as quickly as you can. It is simple and very effective by simply diving in on the side with one arm out over your head, just like Superman, and when you enter the water start swimming hard as you are already between strokes.
The last two exercises were mimicking a log jam and how to get over, never under, the obstruction and trying to free yourself from a trapped foot. These were very interesting techniques and were difficult to get out of, even in a low water environment.
“We were warned about this and guess what? This happened to me.
“This dive method is really useful if you don’t know how deep the water is ...
“The force you had to use to swim out was confronting and extremely hard.
40 | BWA June 2021

Day 3 – Machinery CanyonThe last day was spent in Machinery Canyon focusing on vertical rescue techniques. It was great to be in the canyon and completing it fully, especially on the last day of the course. Also, due to the location of this canyon it had a lot less water compared to Dove Canyon so it was a relatively dry day. A lot was covered so here is a quick overview and the main techniques we learnt from the day.
First we learnt about mechanical haul systems which are used by rescuers when they need to haul someone up, or even for rock climbers on a multi-pitch climb hauling gear. The haul system reduces the effort to raise a load and for a 3 to 1 hauling system, for every 3 metres of rope that you haul, you move the person 1 metre. Calculating the ratio of a pulley system is to count the lines that pull the load, 3 lines equals a 3:1 and each rope is supporting a third of the load. So if you have a heavy load you can increase the pulley system up to a 7:1 to make the heavy weight easier to haul. Without going into further detail, here is a great link with diagrams to further explain the 3:1 system.
Further into the canyon we tried methods of setting the line when you don’t know how much rope you need to touch the bottom, guided rappels, setting a meat anchor, this is when a person is used as an anchor, and using a rope bag for a tension line.
When setting the rope length it is a good idea to have a releasable anchor so you can lower the person if there is not enough rope and for communication, ensure you establish an understanding of what whistle and hand signals will be used and mean before the first person goes over the cliff edge. Communication is the key here.
Guided rappels are great for avoiding obstacles like a pool at the bottom of a waterfall. Think of a guided rappel as a combined rappel and zipline. The zipline is anchored top and bottom tight enough so that the abseiler misses the obstacle. The bottom of the rope can either be a meat anchor (someone holding the line) or tied to a tree. The abseiler clips on to the zipline with a sling. When the obstacle is reached the zipline takes most of the weight and the person abseils while sliding on the zipline. See the photo on page 43.
Lastly, a cut-away rescue was practised and even though I knew I was in good hands it
Day 2 - Anthony demonstating a tensioned line crossing
“First we learnt about mechanical haul systems ...
BWA June 2021 | 41


was nerve-wracking, well for me anyway. When time is of the essence and there is no quick solution, sometimes you need to cut the rope. This needs to be done carefully so as not to drop the abseiler!
Start by attaching a prusik or ascender with a karabiner to the loaded rope for a rope grab. Then attach a spare rope to that karabiner, thread the rope through another karabiner on the anchor, then attach the rope to your belay device. Take the weight with a counterbalanced meat anchor (person with a descender) and carefully cut the loaded rope above the rope grab. Finally, tie an overhand knot in the cut rope, and lower the person using the descender.
This is a technique of last resort with catastrophic consequences if you get it wrong, so the opportunity to practice it in a controlled environment was very valuable.
Knowing how to tie knots and when to use them is essential in canyoning. You should have a good knowledge of knots, including the following.
Stopper knots Double overhand and a figure of eight knot.
Hitches Girth, clove and munter hitches, and a prusik knot.
Bends Double fisherman and a water (aka tape) knot.
Loop knots Alpine butterfly and a figure of eight on a bight.
A few good websites are Canyoning knots and Animated knots. Another great resource is the book called Canyoning Technical Manual by Grant Prattley & David Clearwater. You can spend hours looking at these links and this book practicing knots.
Before you go canyoning, ask yourself, do you know how to abseil, self-rescue or identify a hazard in the water, and how to get out or help someone out if you were to find yourself in a tricky situation? If not, I would suggest you join a canyoning group. Some bushwalking clubs have a canyoning group which you can join, or even go on a commercial tour to see how you like canyoning.
Alternatively, there is an online training course from V7 academy. Start off with their free course to see what you think.
I must say, it is good fun as most of the time you have to walk a fair distance in the bush to get into the canyon so you have the best of both worlds in bushwalking and canyoning.
CMC will run this course again, however you have to wait for the right time and water levels so keep an eye out; in a small group environment the course will book out fast. It is so worth doing.
The author gratefully acknowledges the assistance of Guy Wittig and Anthony O'Hern in writing the article. Any mistakes are the author's responsibility.


Day 3 - Al and Anthony describing cutaway rescue

42 | BWA June 2021